For the fundamentals behind this workflow, start with Adobe Premiere Pro markers: the complete guide.
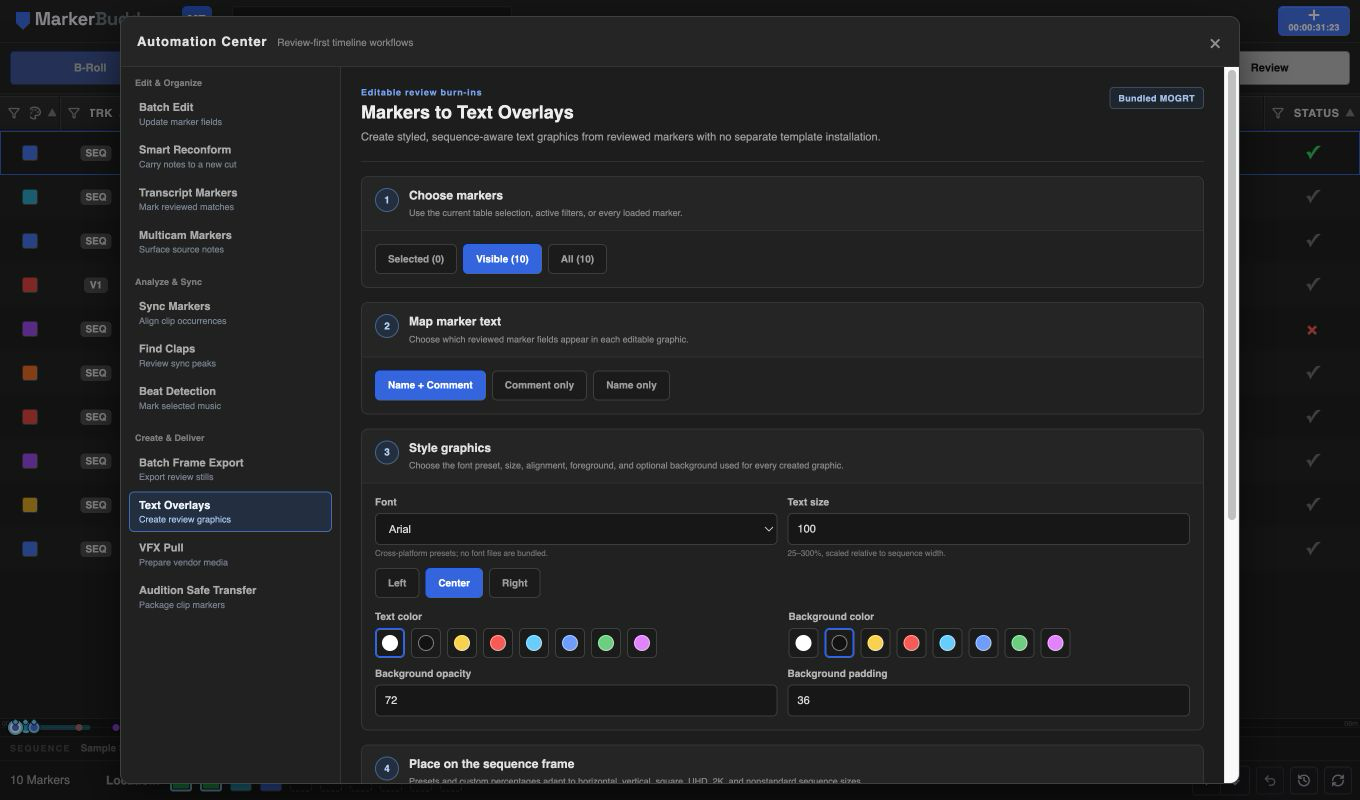
Choose the exact markers and text mapping
Use Selected, Visible, or All to control the marker set. Map the marker name, comment, or both into each graphic. Empty mapped text is skipped and shown in review rather than producing a blank title.
MarkerBuddy limits unusually long text and displays the exact output text and timecode before changing the sequence.
Choose a consistent, editable graphic style
Choose one of four cross-platform font presets, a 25–300% text size, left, center, or right paragraph alignment, text and background colors, background opacity, and background padding. MarkerBuddy does not bundle third-party font files.
The MarkerBuddy Review Text template is included with the plugin. You do not need to install a separate template, and the graphics remain editable in Premiere.
Place graphics relative to the real sequence frame
Choose a top, center, or lower preset, or enter horizontal and vertical percentages. Placement adapts to the active sequence frame, including HD, 4K, vertical, square, and custom dimensions.
If the sequence dimensions change after review, MarkerBuddy asks you to review the placement again before creating graphics.
Set point timing and preserve range markers
Range markers keep their reviewed duration. Point markers use the chosen two, three, five, or eight-second duration, clamp to the end of the sequence, and stop before the next reviewed overlay.
Overlapping range markers are blocked because MarkerBuddy will not silently change an intentional marker range.
Review the destination track before insertion
Choose an existing video track, preferably an empty upper track. MarkerBuddy reads occupied clip ranges and blocks any proposed title that would overlap an existing item.
After confirmation, Premiere creates the reviewed graphics and reports which items were created, skipped, or failed. The graphics remain editable and appear in the normal sequence export.
Workflow
A practical four-step process
-
01
Choose markers and text
Select the reviewed marker scope and map marker names, comments, or both into the output graphics.
-
02
Style and place the graphics
Choose the font preset, size, paragraph alignment, colors, background, and a preset or custom percentage-based frame position.
-
03
Choose timing and track
Set point-marker duration, choose an existing destination video track, and review exact text, timing, dimensions, range behavior, and collision findings.
-
04
Create and verify graphics
Create the approved graphics, then inspect their placement and readability before exporting review media.
Before delivery
Check readability and safe areas
The required editable text template is included. Review readability, safe areas, and the intended delivery crop. MarkerBuddy asks for another review if the sequence frame changes, and it blocks creation when the required controls are unavailable or the destination track is occupied.
