MarkerBuddy User Guide
MarkerBuddy is a panel for Adobe Premiere 25.6 or later that gives you a fast, spreadsheet-style workflow for sequence and clip markers: add and edit markers, search existing Premiere transcripts, import client notes, batch-edit names and timecodes, track completion status, and export post-production formats.
Watch the complete MarkerBuddy walkthrough
Prefer to watch? This guide covers installation and the core MarkerBuddy workflow in Premiere. Use the written guide below when you want step-by-step details.
The embedded player is hosted by YouTube. Watch directly on YouTube.
Installation
MarkerBuddy ships as a standard Adobe add-on package (MarkerBuddy-1.5.1.ccx).
- From the package: double-click the .ccx file (or install it through Adobe Creative Cloud) and restart Premiere.
Once installed, open the panel from Window → Extensions (UXP) → MarkerBuddy. The panel needs an active sequence - open one in the Timeline and MarkerBuddy detects it automatically, along with its frame rate, drop-frame setting, and duration.
Requirements: Premiere 25.6.0 or later. Stream Deck users also need Stream Deck 7.1 or later on macOS 13 or later or Windows 10 or later. The panel requests local file system access (import/export), clipboard read/write (copy-as-text and paste), and permission to reveal exported files.
The optional Stream Deck integration uses the separate MarkerBuddy Stream Deck installer.
MarkerBuddy Lite
MarkerBuddy Lite 1.5.1 is the free, main-panel-only edition and a basic replacement for Premiere's marker panel. MarkerBuddy Lite and full MarkerBuddy are both at version 1.5.1. Its separate Adobe Marketplace plugin ID is 98803369.
Functional in Lite
- Add, edit, select, delete, copy, paste, navigate, search, filter, sort, and use Completed, Pending, or Skipped status.
- Undo, History, centered Mini Timeline selections, Add Marker defaults, columns, and presets.
- Location Memory 1 with right-click removal, plus pasted plain-text notes.
- Automatic displayed clip-marker location refresh after cut, paste, or move edits.
Visible and locked
- Detailed read-only previews for all 12 Automation Center tools, including Jump Cut Detector, and all 21 exports, plus the eight visibly locked factory Quick Markers.
- Stream Deck is a locked menu item that opens the upgrade prompt directly; Lite does not show a Stream Deck preview.
- Auto-Rescue Clip Markers.
- Location Memories 2-10 and advanced marker actions.
- Companion panels, file imports, and structured formats.
Five successfully imported markers per sequence
Get the full version of MarkerBuddyAfter purchasing, confirm full MarkerBuddy works, then uninstall MarkerBuddy Lite to avoid keeping two similarly named panels in Premiere.
The main dashboard
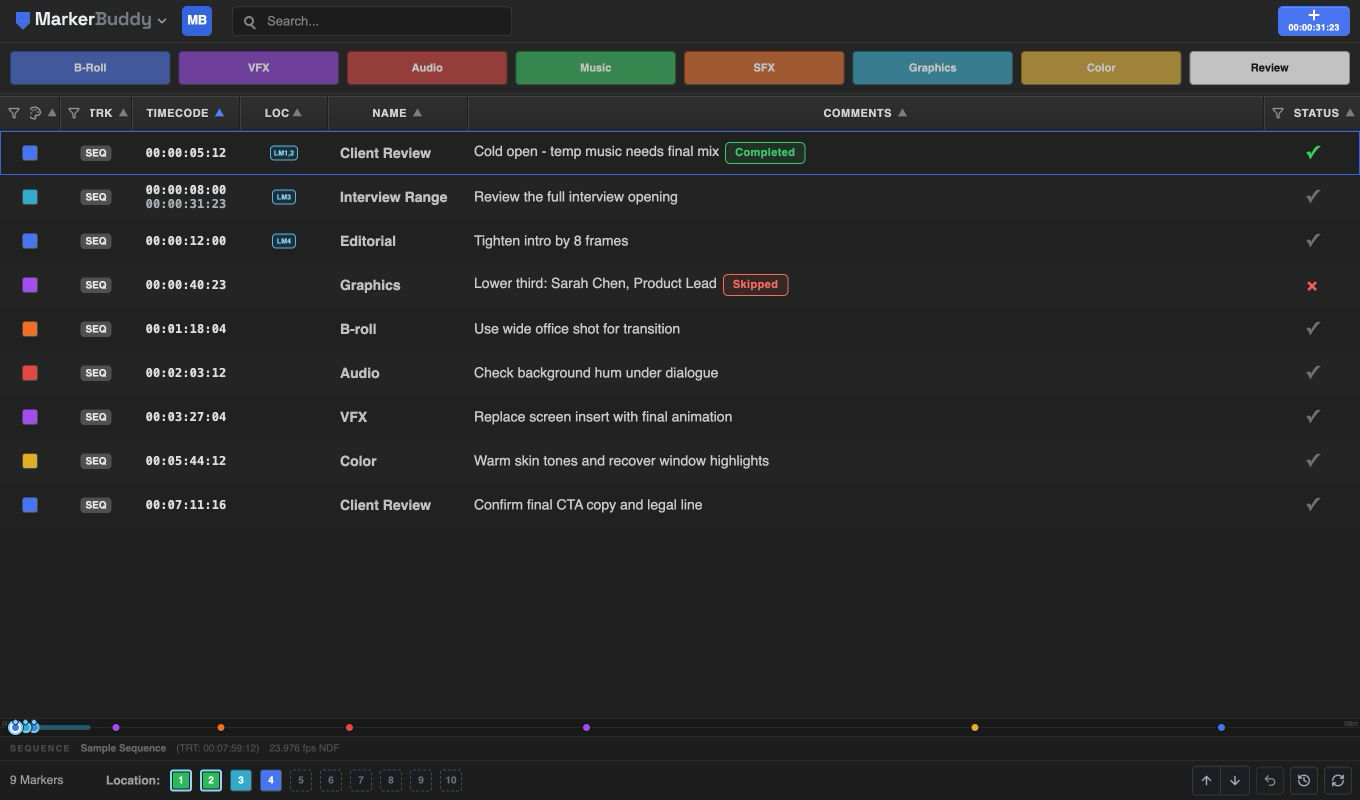
The panel is organized into four zones, top to bottom:
- Header bar - the MarkerBuddy menu, Search, the Quick Markers show/hide button, and the blue Add Marker button showing the current playhead timecode. Quick Markers sits immediately left of Add Marker.
- Marker table - every marker in the active sequence, one row per marker, with configurable Color, Track, Timecode, LOC, Name, Comments, and Status columns.
- Mini timeline - a miniature map with a circular dot for each point marker and a horizontal bar for each spanned marker. A saved Location Marker keeps that normal shape and gains a connected LM# tag.
- Footer bar - marker/selection counts, ten equal LM1-LM10 Location Memory controls, delete-selected, previous/next navigation, paste, undo, undo history, and refresh.
The strip above the footer starts with SEQUENCE: followed by the sequence name, total running time (TRT), frame rate, and drop-frame status. Status and error messages (for example Imported 7 markers.) appear just above the footer.
Companion panels in MarkerBuddy 1.5
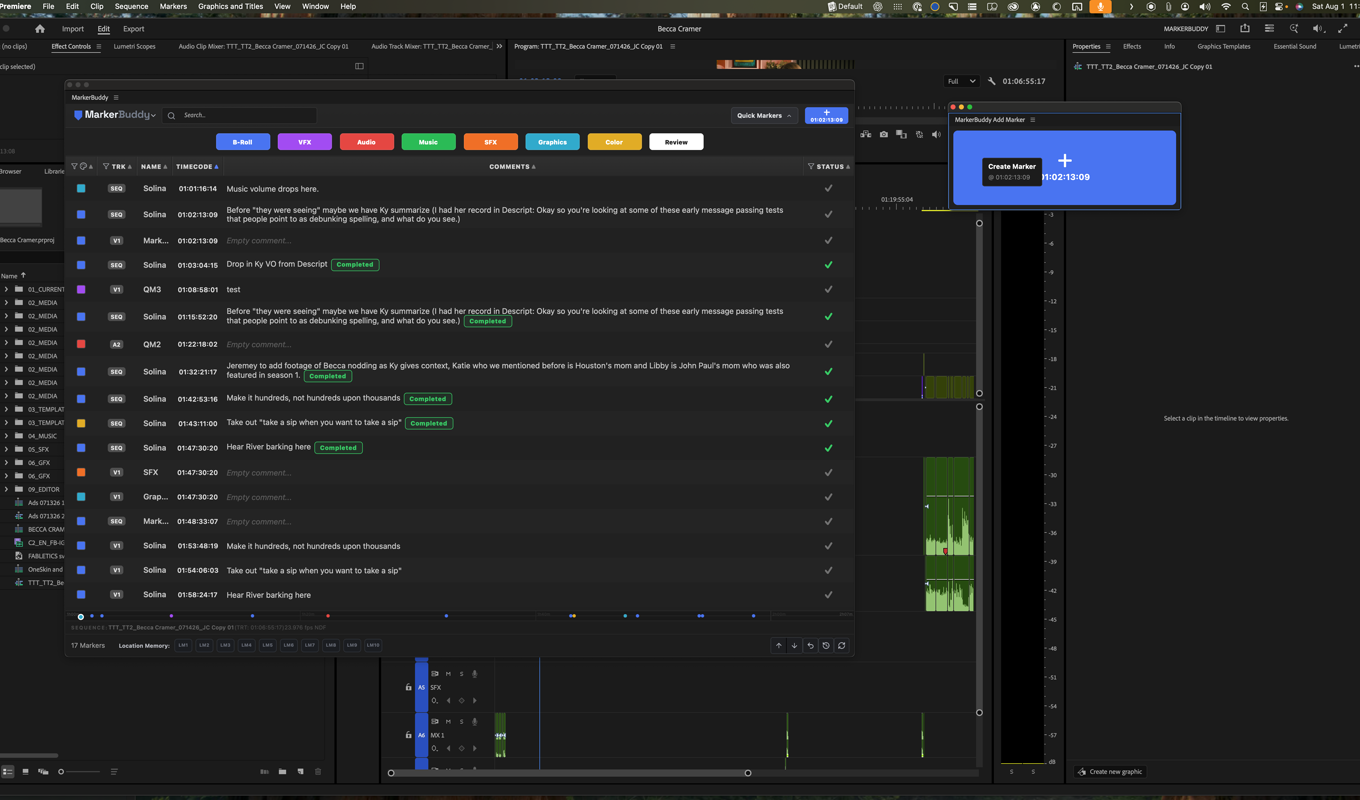
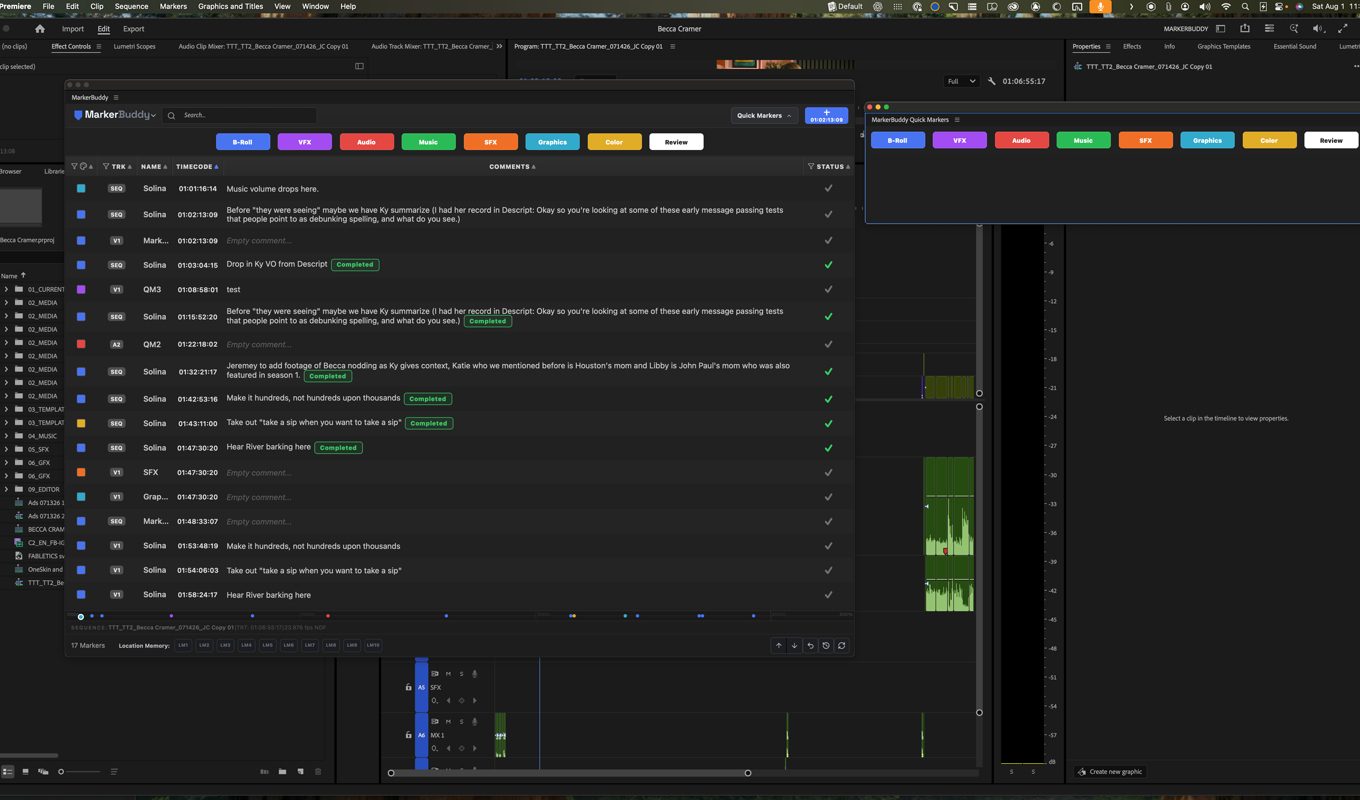
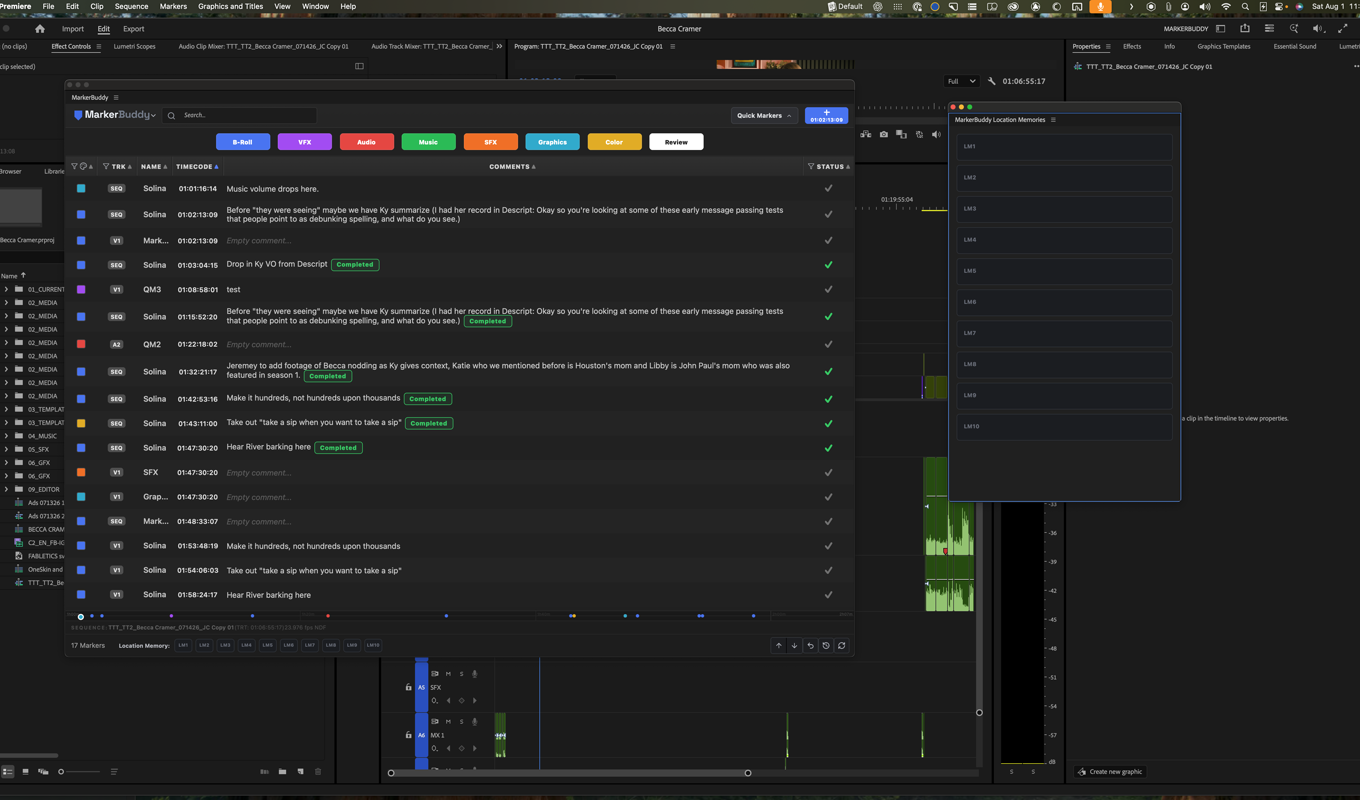
The MarkerBuddy menu starts with Import Notes/Markers, Automation Center, and Export As, then a separator followed by Add Marker Panel, Quick Markers Panel, and Location Memories Panel.
- Synchronized mirrors - Quick Markers and Location Memories remain usable in the Main Panel while their companion panels are open. Actions and changes appear in both views immediately.
- Add Marker Panel - its responsive button follows the Main Panel button's name, color, timecode, and enabled state. Change Default Marker Settings from the Main Panel button; the separate button has no right-click customization menu.
- Main Panel dialogs - Import Notes/Markers and Export As open centered in Main with an X and Escape or outside-click close behavior. Their Window menu entries provide alternate independent panels.
- Independent Automation Center - keep using Main and Premiere while Automation Center remains open. Close its native Premiere panel tab or floating window when finished.
- Find an open panel - select Automation Center, Add Marker Panel, Quick Markers Panel, or Location Memories Panel again to ask Premiere to reveal the existing panel without duplicating or resetting it.
- Responsive detail - Quick Markers wraps cleanly in narrow panels. Location Memories becomes a vertical list showing LM number, the first five comment words, timecode, and a full-width marker-color line.
Premiere also lists the individual panels under Window → UXP Plugins → MarkerBuddy. Adobe controls that native menu and does not let a plugin add another grouping submenu.
Location Markers (Location Memory)
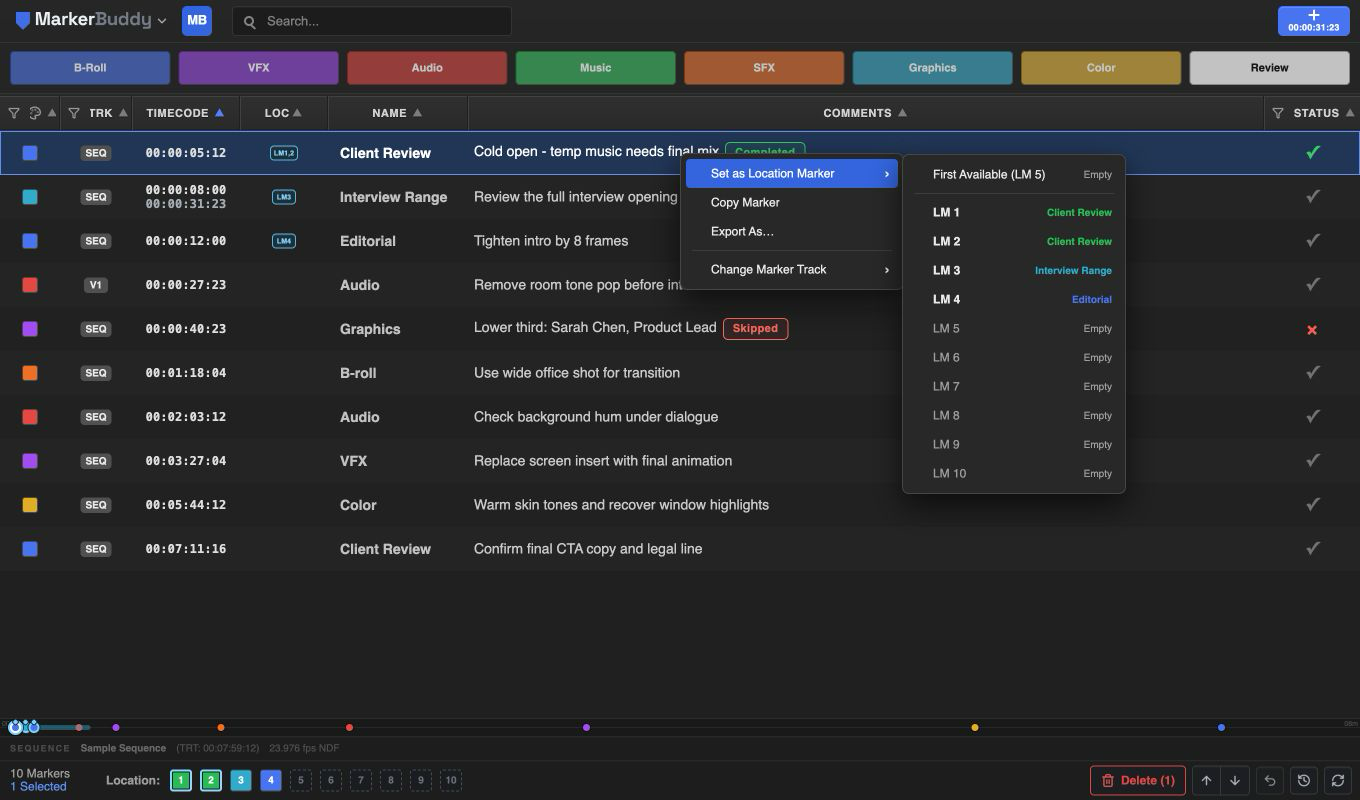
The footer presents ten sequence-specific controls labeled LM1-LM10. Location Memories point only to sequence markers so the assignments can travel with the Premiere project. Clicking an occupied control jumps the playhead to that marker and makes it the focused selection.
- Assign or replace directly - drag the exact marker row onto a slot, or right-click one marker and choose Set as Location Marker. Choose First Available or any explicit LM 1-LM 10 entry; choosing an occupied slot deliberately replaces its assignment.
- Sequence markers only - assigning a sequence marker is immediate. If you start with a clip marker, MarkerBuddy shows Location Memories must be sequence markers. Choose Convert & Assign to replace it with a sequence marker at the same timeline position, or Cancel. Cancel leaves the clip marker unchanged; conversion leaves the sequence marker, not a duplicate clip marker.
- Multiple selections - row dragging remains available when two or more markers are selected because the dragged row identifies the intended marker. Occupied slots remain available for jumping.
- Manage - right-click an occupied slot for Jump or Clear. The Context Menu key or Shift+F10 opens the menu; Delete or Backspace clears an occupied focused slot.
- Recognize saved markers - the LOC column shows each assigned LM number, and the mini timeline labels saved locations with LM#. Occupied footer controls use the marker color.
- Portable and undoable - MarkerBuddy stores the assignment in the sequence marker's native comment data. Save and share the Premiere project normally; another editor using MarkerBuddy sees the assignment when the marker and comment are present. Assign, replace, clear, and clip-to-sequence conversion join MarkerBuddy Undo.
- Older assignments - Location Memories created before 1.4.1 may be local-only. Reassign each older slot once in 1.4.1 to make it portable.
- Comments and exports - MarkerBuddy hides the compact assignment record in its own comment editor and standard exports. Software that reads the unprocessed marker comment may display that record.
- Safe recovery - if MarkerBuddy cannot find one unique assigned marker, the slot shows a warning and does not jump. Reassign the intended marker or clear the slot.
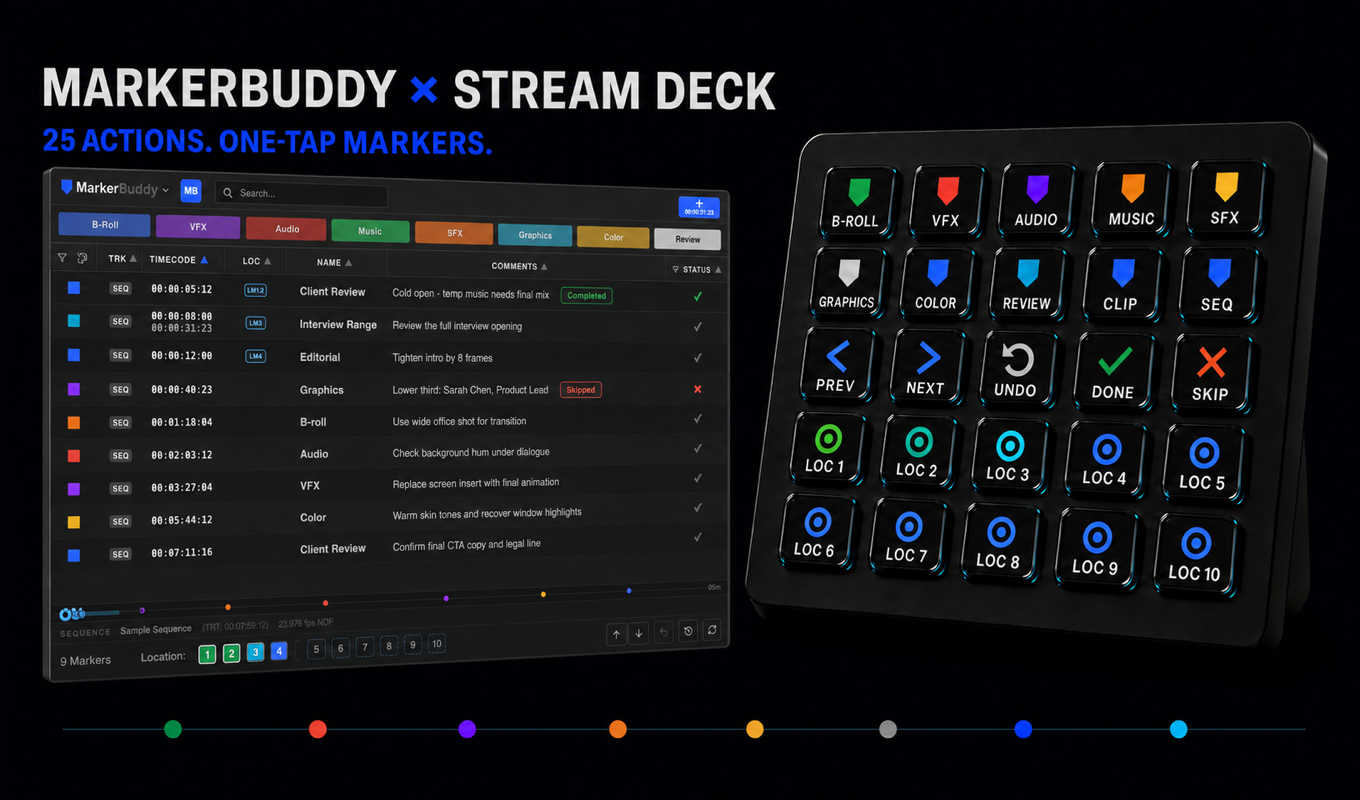
The matching Location Memory 1-10 Stream Deck actions jump to these same slots. Their numbered key faces all use the same blue bullseye and do not inherit a slot marker's name or color. If MarkerBuddy is still opening, the command waits until the active sequence is ready.
Adding markers
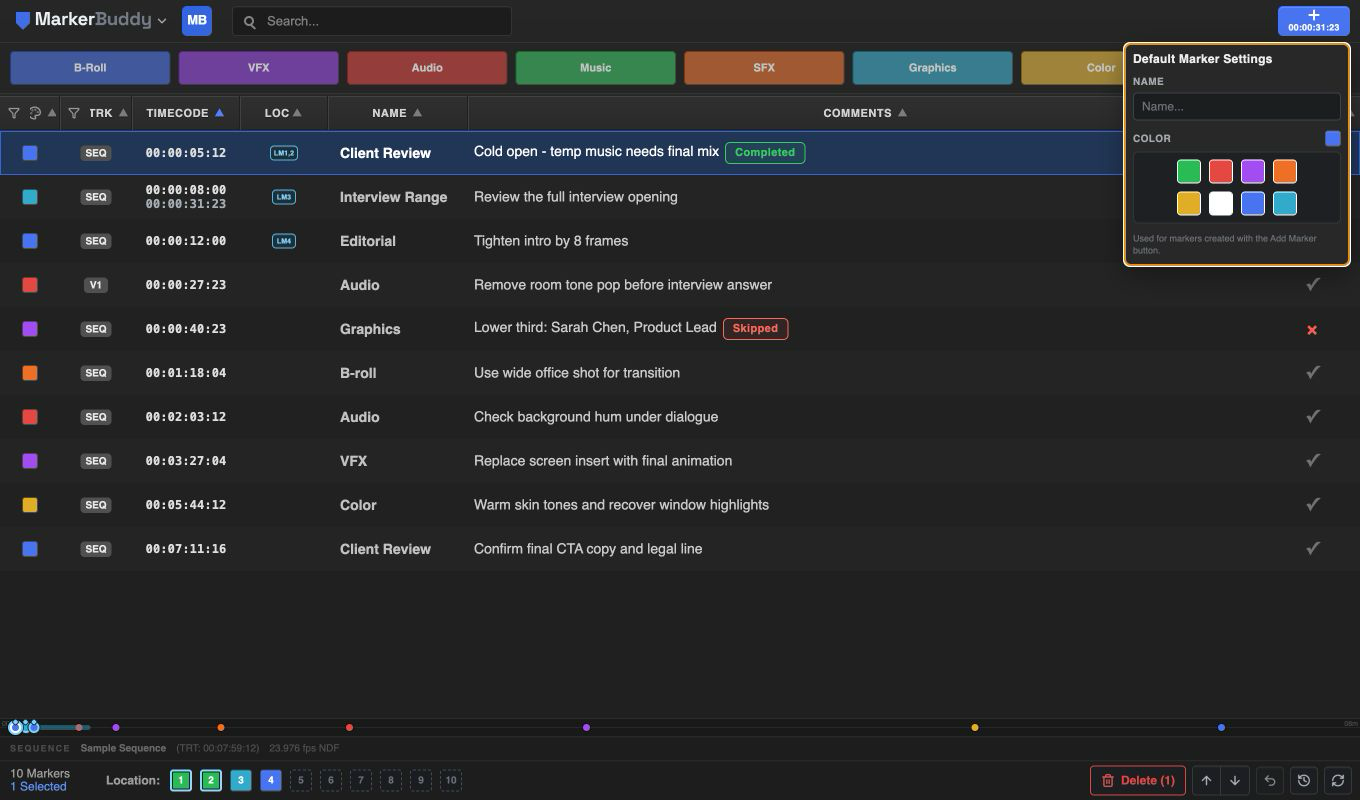
Click the blue + button in the top-right corner (it always displays the current playhead timecode) to instantly add a marker at the playhead.
- Default name and color - right-click the Add Marker button to open Default Marker Settings, then edit the name or choose one of Premiere's eight colors. Hovering the add button explains that right-click action.
- Sequence vs. clip markers - without an In/Out range, MarkerBuddy adds a clip marker to the topmost eligible clip under the playhead. With a valid sequence In/Out range, it always creates a sequence marker spanning that range. MarkerBuddy refreshes the live In/Out state immediately before adding.
- Spanned markers - the table stacks the start timecode over the end timecode, the mini timeline draws the complete span, and jumping goes to the start.
- Coexistence - point clip markers and point sequence markers can remain inside a spanned sequence marker. An overlapping marker never prevents the span from being created or displayed.
Stream Deck Add Clip Marker creates a point clip marker at the playhead. Stream Deck Add Sequence Marker follows the panel Add Marker behavior: it spans an active sequence In/Out range, or creates a point sequence marker at the playhead when no range is active.
Quick Markers
Quick Markers are eight reusable marker templates on a one-click toolbar - ideal for repetitive logging passes (e.g. "FIX AUDIO", "VFX", "B-ROLL"). Quick Markers starts closed on a new installation. Use the Quick Markers button immediately left of Add Marker to show or hide the bar. Its chevron shows the current state, MarkerBuddy remembers your choice, and the templates wrap automatically when the panel is narrow.
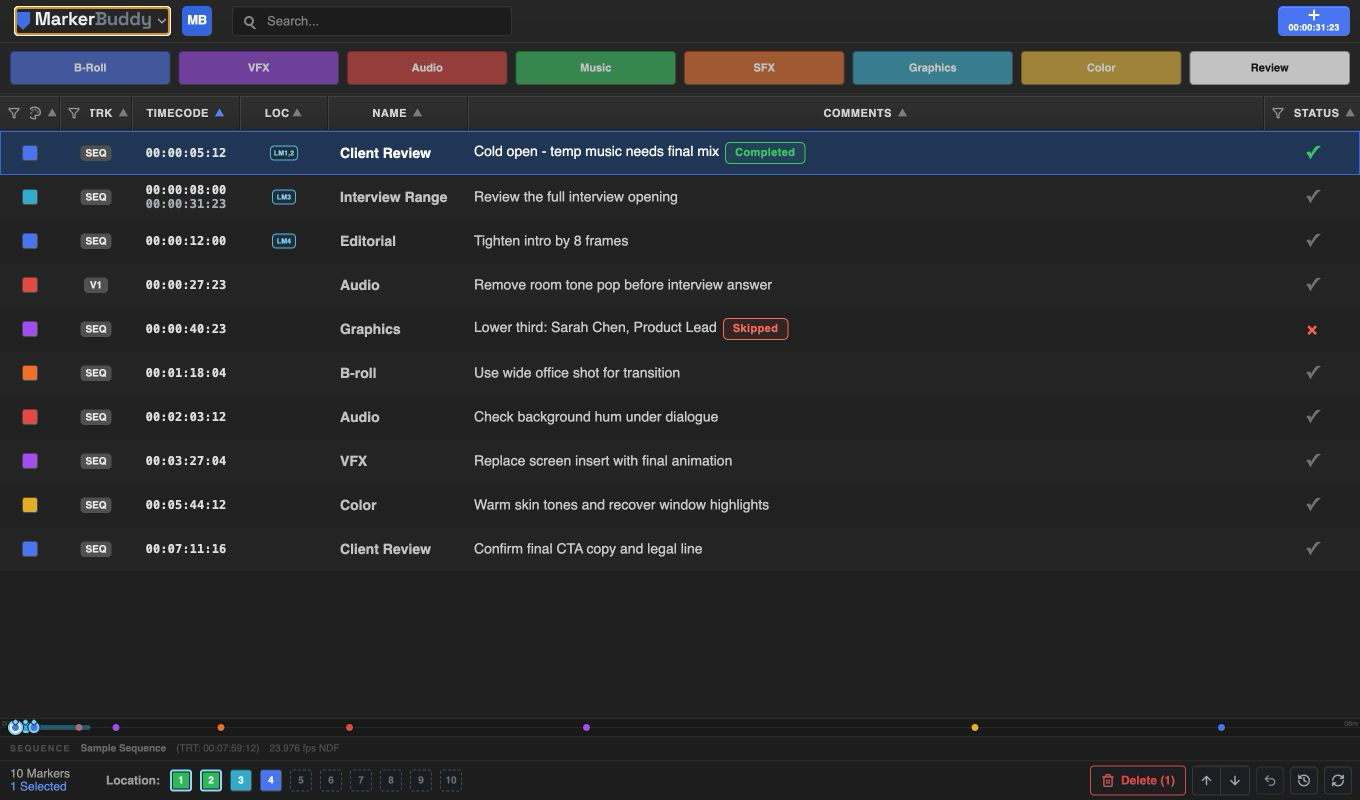
- Click a slot (QM1–QM8) to instantly drop a marker at the playhead using that template's name, color, and comment.
- Right-click a slot to configure it.
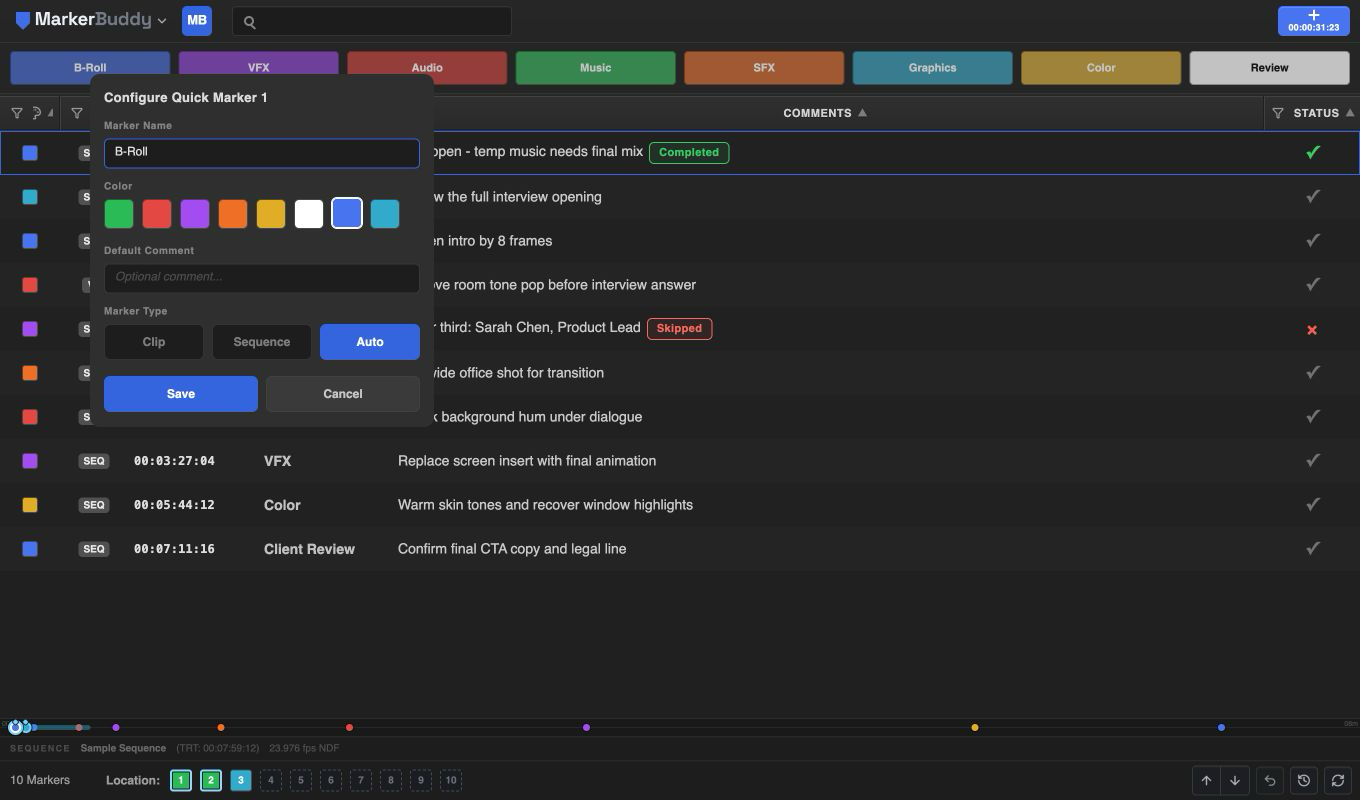
On a fresh install, the slots start as B-Roll (Blue), VFX (Purple), Audio (Red), Music (Green), SFX (Orange), Graphics (Teal), Color (Yellow), and Review (White). They use Auto placement and blank comments. Upgrading replaces only the untouched legacy QM1–QM8 factory set; any customized name, color, comment, or marker type remains unchanged. Each template stores a marker name (used verbatim; empty slots show as QM1–QM8), a color, an optional default comment, and a marker type - Clip (topmost clip under the playhead), Sequence, or Auto. Templates persist between sessions. MarkerBuddy 1.5.1 can also trigger all eight saved slots from Stream Deck. MarkerBuddy commands do not appear as assignable items in Premiere's Edit → Keyboard Shortcuts window.
Stream Deck integration
MarkerBuddy 1.5.1 includes a fully local Stream Deck plugin with 25 independent actions: Quick Marker 1-8, Add Clip Marker, Add Sequence Marker, Previous Marker, Next Marker, Undo, Mark as Complete, Mark as Skipped, and Location Memory 1-10. The shipped Quick Marker faces show the factory B-Roll, VFX, Audio, Music, SFX, Graphics, Color, and Review names with matching colors; customized template values do not live-update this static artwork. Every numbered Location Memory face uses the same blue bullseye. No cloud bridge, account, or network connection is used.
Install and assign the actions
- Install or update the MarkerBuddy Adobe plugin to version 1.5.1.
- Install Stream Deck 7.1 or later.
- Download the MarkerBuddy Stream Deck installer, double-click it, and confirm the installation in Stream Deck.
- Search Stream Deck's action list for MarkerBuddy, then drag any of the 25 actions onto keys.
- Start Premiere and open an active sequence. The first key press also opens or shows MarkerBuddy if its panel is closed.
What each key does
- Quick Marker 1-8 uses the matching saved template, including its name, color, comment, and Clip/Sequence/Auto type.
- Add Clip Marker creates a point marker on the topmost eligible clip at the playhead. Add Sequence Marker spans the active sequence In/Out range, or creates a point marker at the playhead when no range is active.
- Previous Marker and Next Marker select and jump to the previous or next visible marker, wrapping at the beginning or end.
- Undo restores the latest entry in MarkerBuddy's own undo history.
- Mark as Complete and Mark as Skipped apply that explicit status to the focused marker. Repeating the same action keeps the marker in that status.
- Location Memory 1-10 jumps to the corresponding sequence-specific footer slot, moves the playhead, and makes that marker the focused selection. Assign or replace the slot in MarkerBuddy first.
- A green check means the command reached MarkerBuddy. A yellow alert means it could not be delivered; confirm that Premiere is running, a sequence is active, MarkerBuddy 1.5.1 is installed, and the requested Quick Marker or Location Memory slot is configured.
macOS permission: open System Settings → Privacy & Security → Accessibility, enable Stream Deck, then quit and reopen Stream Deck.
Windows: company security settings must allow Stream Deck to control Premiere. If a key cannot reach MarkerBuddy, ask an administrator to allow that control.
The marker table
- Selecting rows - click neutral row space for one marker, Command/Ctrl-click to toggle, Shift-click for a visible inclusive range, or Command/Ctrl+Shift-click to add a range. Click unused table space below the rows to clear the current selection. Search and filters prune hidden selections.
- Bulk changes - Color, Name, Comments, Complete, Skip, status restore, Batch Edit, copy, export, and conversion use the selected rows. Starting any of those row actions on an unselected marker changes only that marker.
- Track and context actions - left-click a selected TRK badge or use the selected group's right-click menu to change the whole selection. Right-click a Location Memory row or badge to remove an assignment. Right-click Status for Completed, Pending, then Skipped; right-click Timecode for direct editing, or empty space for Paste when available and Import.
- Sorting - click a header to sort and click again to reverse.
- Reordering - drag a header and drop it at the insertion indicator. Normal clicks still sort, while filter buttons and resize handles keep their own actions.
- Hiding - right-click any header for Hide [Column] or Column Settings…. The Context Menu key and Shift+F10 open the same menu. Every current column, including Timecode and LOC, can be hidden.
- Resizing - drag a column divider. Comments expands to use available width when it is visible.
- Filters stay active - hiding or moving Color, Track, or Status never clears its filter.
- Automatic layout persistence - order, visibility, and widths are restored after panel or Premiere relaunches.
- All-hidden recovery - the table displays All columns are hidden and directs you to Column Settings.
Marker colors
MarkerBuddy uses Premiere's eight marker colors:
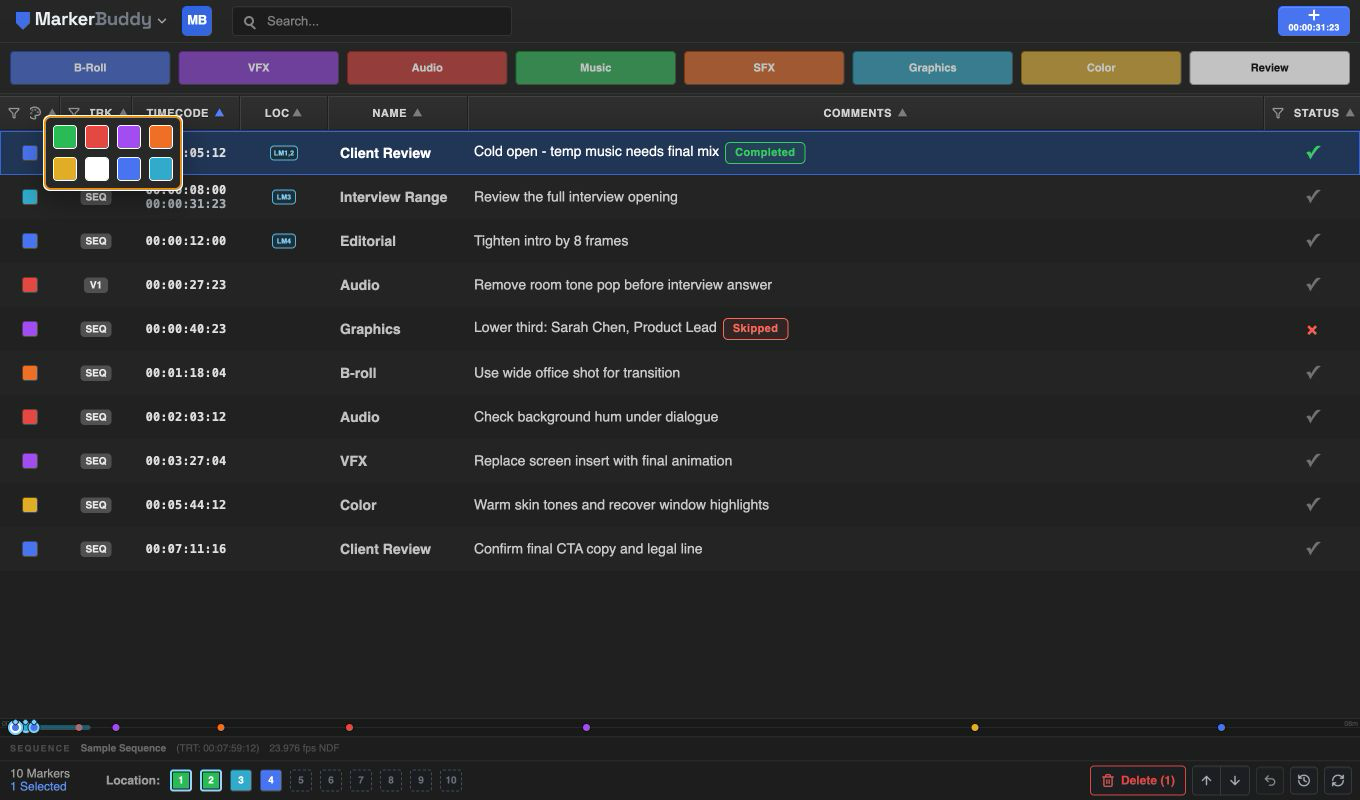
Click any marker's color chip to open the color menu and recolor it. With multiple markers selected, the new color applies to the whole selection. The same palette appears in the table header (as a color filter), in the Import panel, in Quick Marker configuration, and in Default Marker Settings (right-click the Add Marker button).
Completion status
The Status column turns the marker list into a to-do list for client notes and QC passes:
- Click the gray check to mark a row Completed. If it belongs to a multi-row selection, the full selection becomes Completed in one operation.
- Right-click a status control to choose Completed, Pending, or Skipped in that order. Starting on a selected row applies the choice to the full selection; starting on an unselected row changes only that row.
- A COMPLETED or SKIPPED badge appears beside the comment, and the Status column shows the same state. Changing Completed to Skipped replaces the green outline with the red Skipped outline immediately.
- Completion and skip metadata remains in the marker record and exports. Clearing the status restores the marker's original color.
- Filter unfinished notes as Pending from the Status header menu.
- Show or hide Status from MarkerBuddy menu → Column Settings… or the Status header's right-click menu.
Column layout, search, filters, and saved presets
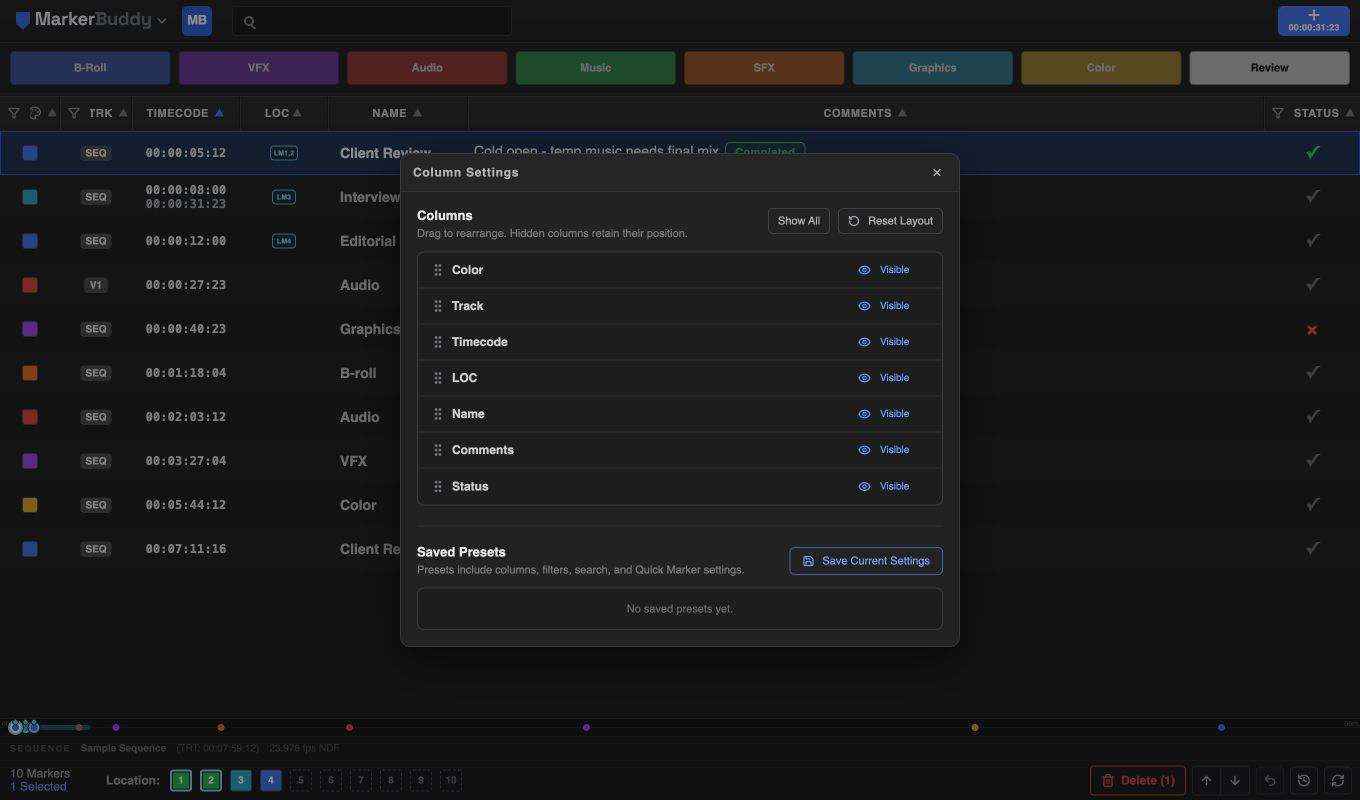
Open MarkerBuddy menu → Column Settings… to drag the seven supported columns into order, change visibility, Show All, or Reset Layout. LOC follows Timecode and remains hidden until a Location Marker assignment makes it relevant. Reset restores default order, visibility, and widths without changing filters.
- Search - matches marker names, comments, colors, and tracks as you type. Partial color names and aliases, plus partial SEQ, video, audio, and numbered track labels, match while typing. When text is present, use the inline × at the right end of the field to clear only the search.
- Color, Track, and Status filters - open the matching header filter buttons.
- Clear filters - the separate header control appears only for active Color, Track, or Status filters and leaves search text unchanged.
Saved Presets
A saved preset restores column order, visibility, and resizable widths; Color, Track, and Status filters; search text; all eight Quick Marker templates; and Quick Marker bar visibility. Sorting, marker selection, and the Premiere playhead are not stored.
- Set up columns, filters, search, and Quick Markers.
- Choose Save Current Settings and name the preset.
- Apply, rename, or delete it from Saved Presets. Applying closes Column Settings, updates the table immediately, and confirms the preset.
Presets persist between sessions. Older presets remain usable; a preset without saved order or visibility leaves the current order and visibility unchanged.
Transcript Markers
Open MarkerBuddy menu → Automation Center, then choose Transcript Markers to search a transcript that Premiere has already created, preview the exact matches, and turn only approved rows into markers.
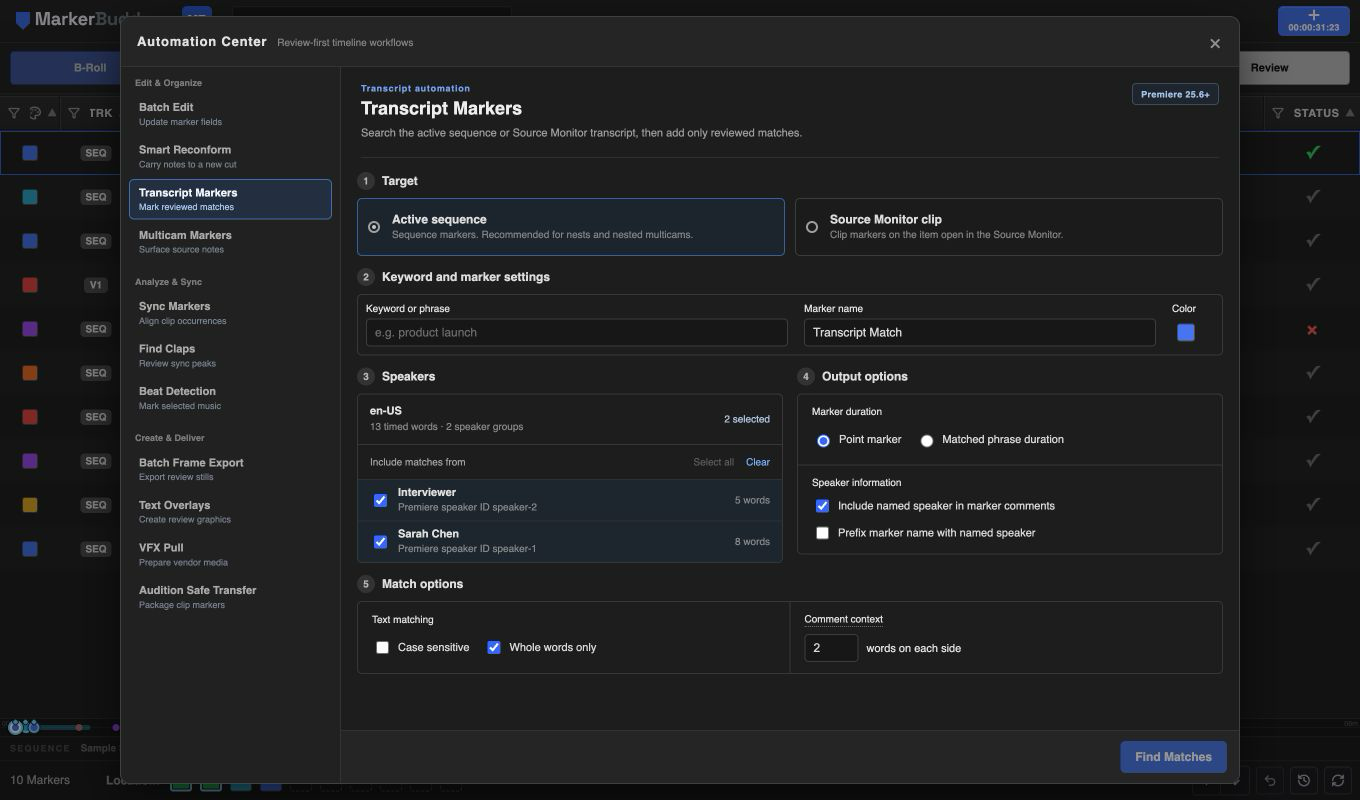
Complete Target, Keyword and marker settings, Speakers, Output options, and Match options. Enter one keyword or phrase, choose the marker name and one of Premiere's eight colors, then select Find Matches to review the results.
Choose the exact Premiere target
- Current active sequence searches the transcript belonging to the sequence that is active in the Timeline. Approved matches become sequence markers at transcript-relative times. A non-zero sequence display start or zero point is not added a second time.
- Source Monitor clip searches the transcript belonging to the exact project item currently open in the Source Monitor. Approved matches become clip markers at source-item-relative times.
- If the active sequence or Source Monitor item changes after the preview, MarkerBuddy rejects the stale target and requires a fresh search before writing anything.
Nested sequences and multicams: Premiere does not tell MarkerBuddy which multicam angle is active. Use Current active sequence for nested or multicam edits so approved matches become sequence markers on the transcript timeline.
Define, review, and create matches
- Choose the target. MarkerBuddy shows its language, timed-word count, speaker groups, and per-speaker word counts.
- Enter one keyword or phrase, a custom marker name, and a Premiere palette color. Each search accepts one keyword or phrase.
- Leave every speaker selected or filter exact Premiere speaker IDs with Select all, Clear, and individual checkboxes. Unlabeled words stay in their own explicit group.
- Choose a point marker or the exact matched-phrase duration. Named speakers can be included in marker comments and can optionally prefix marker names.
- Choose case-sensitive or case-insensitive matching and optional whole-word matching. Phrase matching may cross punctuation while still respecting word boundaries.
- Set Comment words on each side from 0–50. The default 2 writes … two words before keyword two words after …. Set 0 to write only the matched keyword or phrase.
- Click Find Matches. The preview shows the matched text, exact marker-comment preview, speaker when Premiere provides one, transcript time, and destination.
- Approve or clear individual rows, then create the approved markers. No marker is written before this approval step.
MarkerBuddy never forms one phrase match across two different known speakers. Same-speaker matches can still cross adjacent transcript segments. If Premiere provides no speaker IDs, cross-segment matching remains available because a speaker change cannot be identified reliably.
Comment context changes only the comment text. A point marker starts on the first matched word and has no duration. A matched-phrase marker starts on the first word and ends with the last matched word; surrounding comment words never move or extend it.
Large transcripts show progress and can be cancelled. MarkerBuddy adds only approved, non-duplicate markers and reports separate created, skipped, and failed totals. Active-sequence batches are one MarkerBuddy Undo entry; Source Monitor clip-marker batches use Premiere's native Undo.
Missing transcripts
MarkerBuddy cannot start transcription. If the target has no transcript, open Window → Text, select the Transcript tab, transcribe the named sequence or clip in Premiere, then return to MarkerBuddy.
Automation Center
Open MarkerBuddy menu → Automation Center. The twelve tools are ordered Batch Edit, Smart Reconform, Transcript Markers, Multicam Markers, Sync Markers, Find Claps, Beat Detection, Jump Cut Detector, Batch Frame Export, Text Overlays, VFX Pull Prep, and Audition Safe Transfer. Batch Edit is active by default. Each tool keeps its complete setup, progress, review, cancellation, apply, and result flow inside this one center.
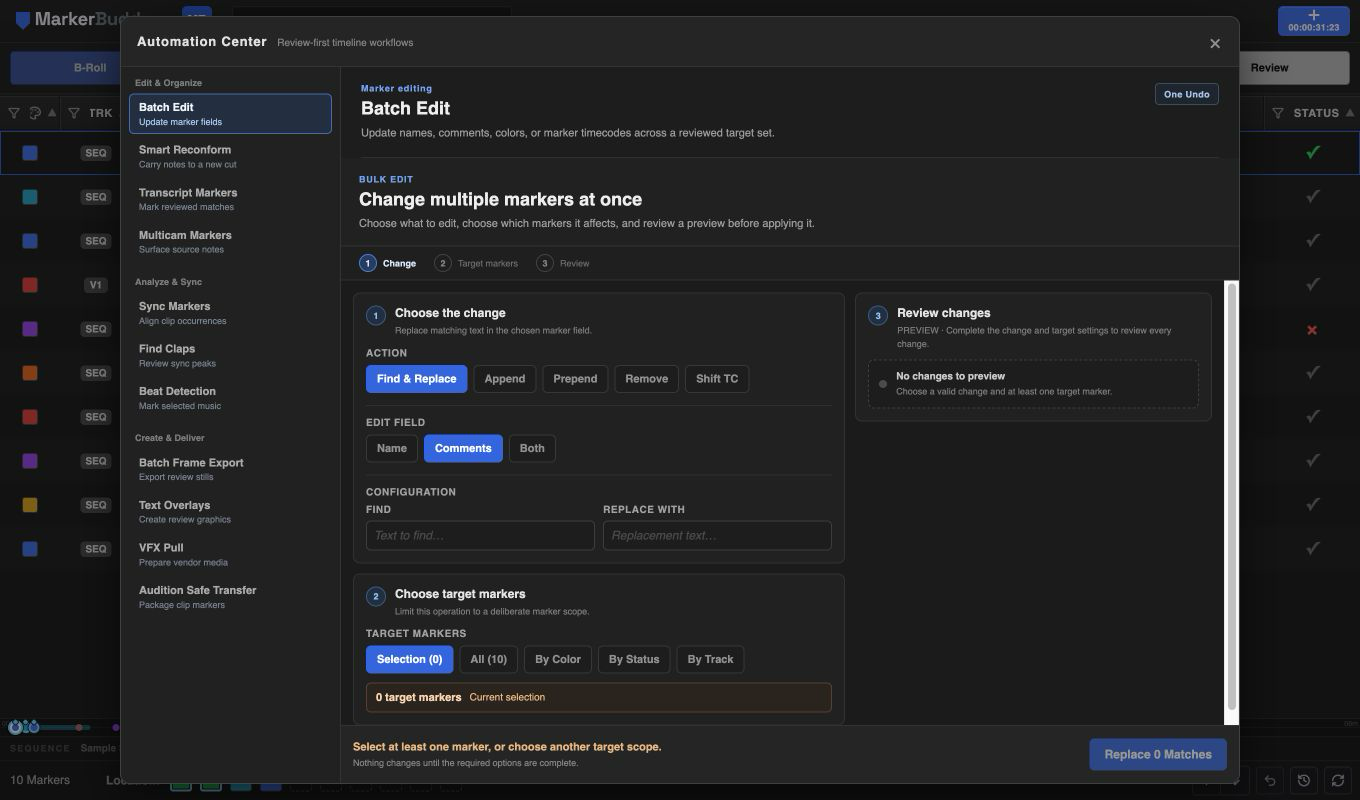
Batch Edit
The first and default tool preserves the complete Change, Target markers, Review, and Apply flow. Find and replace, append, prepend, clear, recolor, and timecode shifts retain live target counts, exact disabled reasons, a complete Before / After preview, one-action apply, and MarkerBuddy Undo.
Smart Reconform
Choose an older source sequence and newer target sequence, analyze automatically, review Exact, Shifted, Ambiguous, Unmatched, and Duplicate candidates, and apply only explicitly approved markers. Nested and multicam uncertainty remains visible and is never guessed.
Transcript Markers
Choose the target, keyword and marker settings, speakers, output options, and match options. Create the transcript in Premiere first, then preview exact keyword or phrase matches in MarkerBuddy and create only approved point or ranged markers.
Find Claps
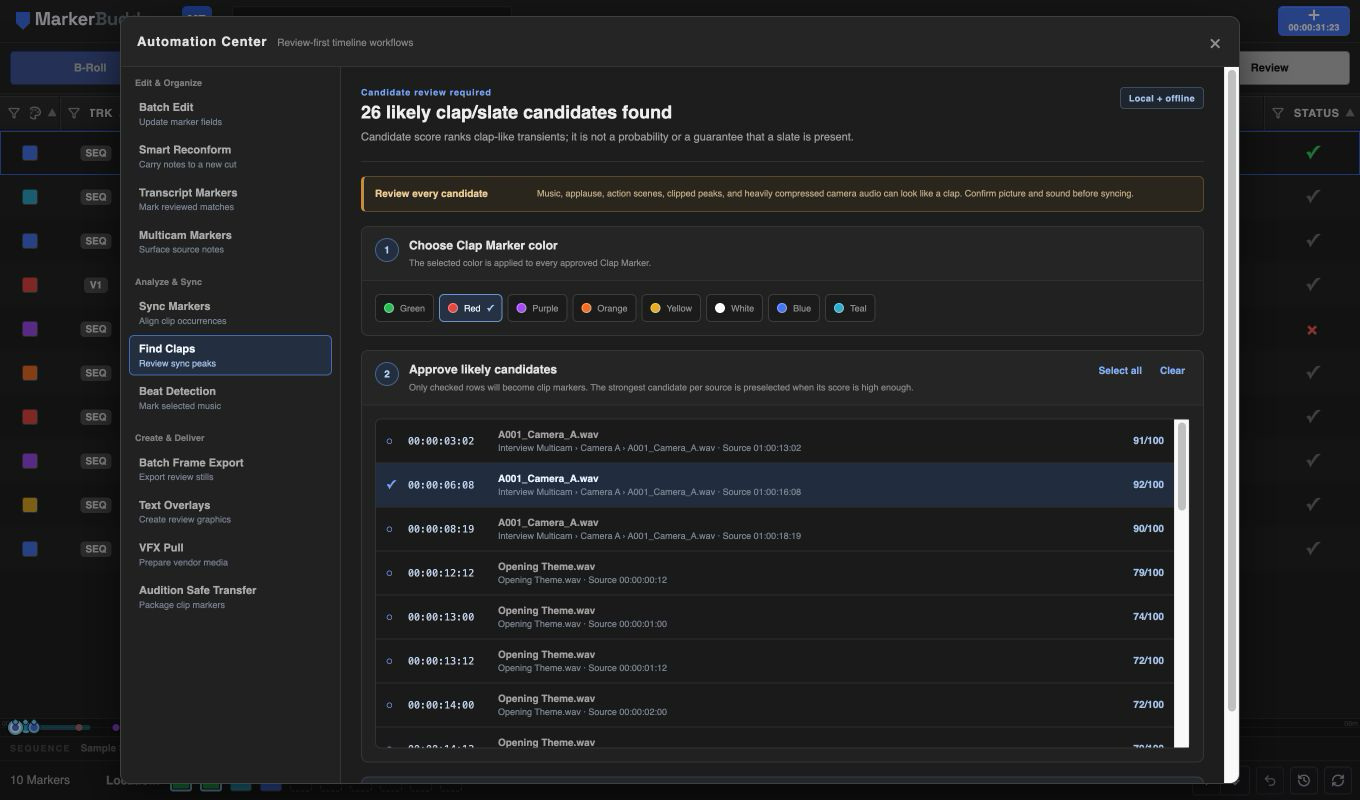
Analyze selected audio, including supported audio inside visible nested sequences, locally and offline. MarkerBuddy ranks clap-like transients, lets you choose one of eight marker colors, and shows every result for review before adding source markers. Approved points are named Clap Marker, with a Clap @ source timecode comment calculated from the source clip. No media or audio samples leave the computer. Music, applause, action scenes, clipped peaks, and heavily compressed camera audio can produce false matches, so compare selected candidates with picture and production sound. Scores rank candidates and are not probabilities.
Read the Find Claps workflow →
Beat Detection
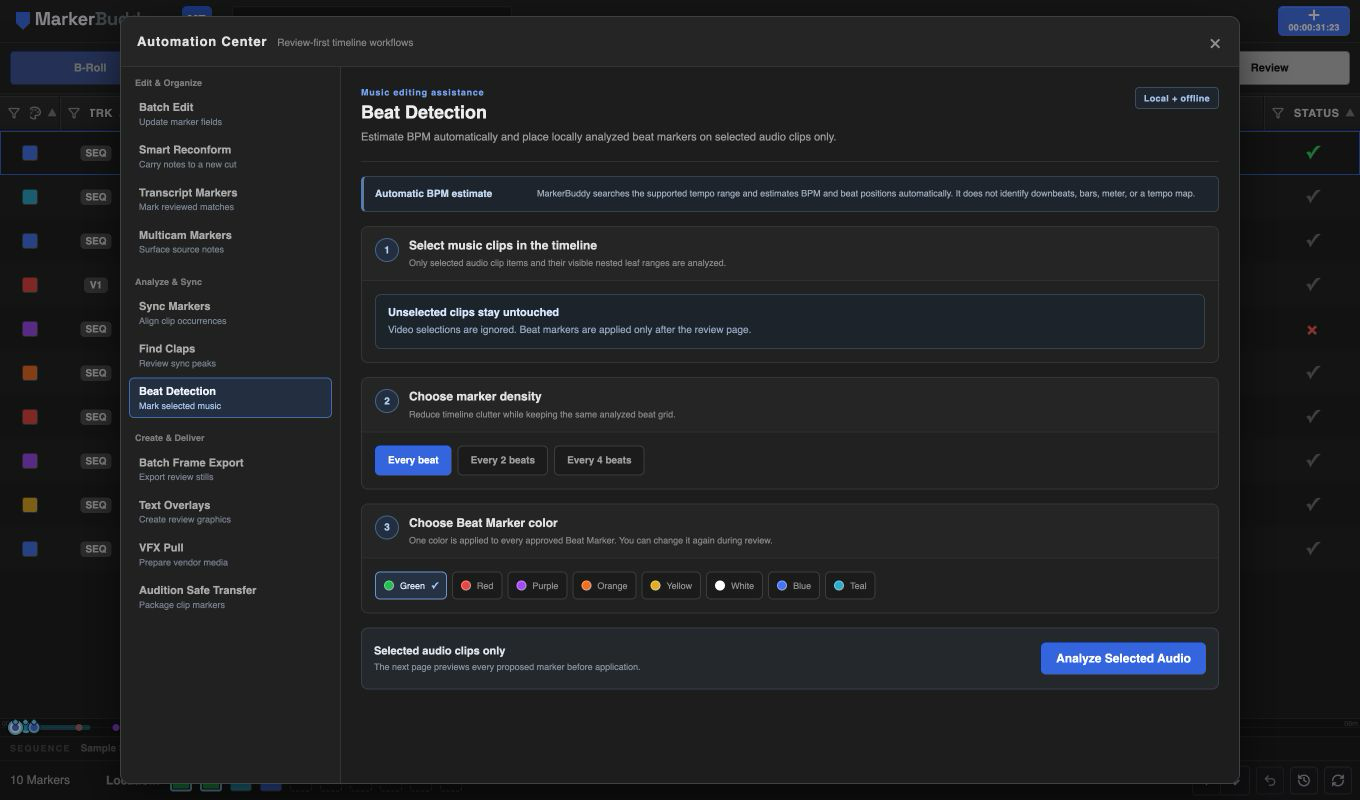
Analyze selected audio clips only, including visible nested ranges, locally and offline; no media or audio samples leave the computer. MarkerBuddy searches the complete supported BPM range automatically. Review the estimated BPM, stability, and every proposed point marker, choose one of eight marker colors, then choose every beat, every second beat, or every fourth beat. Approved points are named Beat Marker with empty comments. It estimates pulse timing only; identify downbeats, bars, meter, phrasing, and tempo changes during review.
Read the Beat Detection workflow →
Jump Cut Detector
Scan every enabled, unmuted video track for exact back-to-back cuts whose two clips have the same case-sensitive filename and extension. MarkerBuddy follows supported ordinary nested timing and compares multicam segments by the exact angle-specific label visible on the timeline. Empty or generic multicam labels and ambiguous nested boundaries are reported for manual review instead of guessed. Review all candidates before creating red point sequence markers named Jump Cut Detector with the comment POSSIBLE JUMP CUT DETECTED. A rerun skips an existing detector marker at the same exact cut.
Batch Frame Export
Export Selected, Visible, or All marker frames at full sequence resolution as BMP, DPX, GIF, JPG, EXR, PNG, TGA, or TIF. Range markers support first, middle, or last included frame. Naming tokens include sequence, index, name, color, timecode, and clip. Invalid filename punctuation is sanitized; existing files can be skipped or numbered. Review, progress, cancellation, reveal-folder, and a final result summary are included.
Read the Batch Frame Export workflow →
Sync Markers
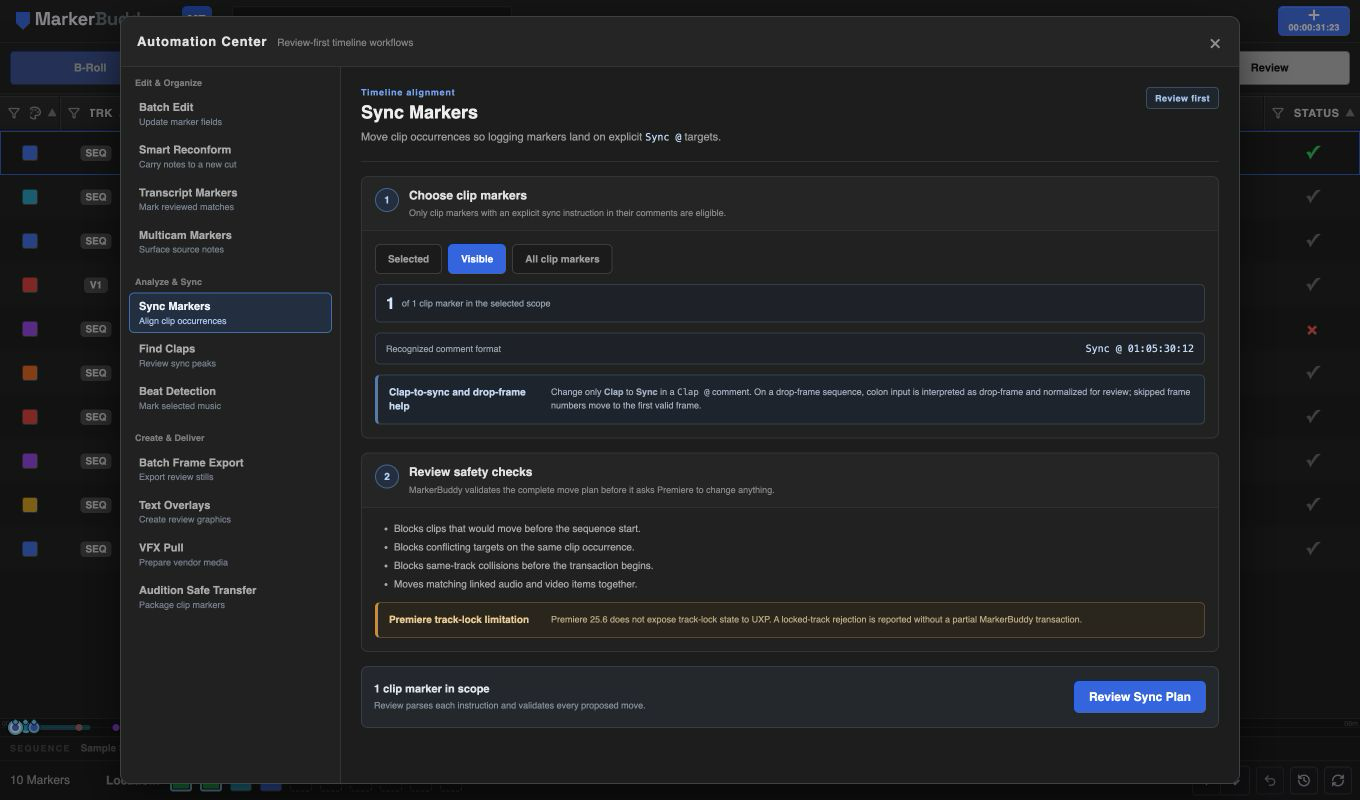
Only clip markers with an explicit Sync @ HH:MM:SS:FF instruction are eligible. Change only Clap to Sync in an existing Clap @ comment to reuse its source timecode. Naked comment timecodes are ignored. On a drop-frame sequence, mistaken colon input is interpreted on the sequence drop-frame clock, impossible skipped frame numbers are translated to the first valid frame, and the normalized semicolon target is shown for review. Safety checks block negative starts, conflicting targets, and same-track collisions. Linked audio and video move together only after the complete plan passes review.
Read the Sync Markers workflow →
Multicam Markers
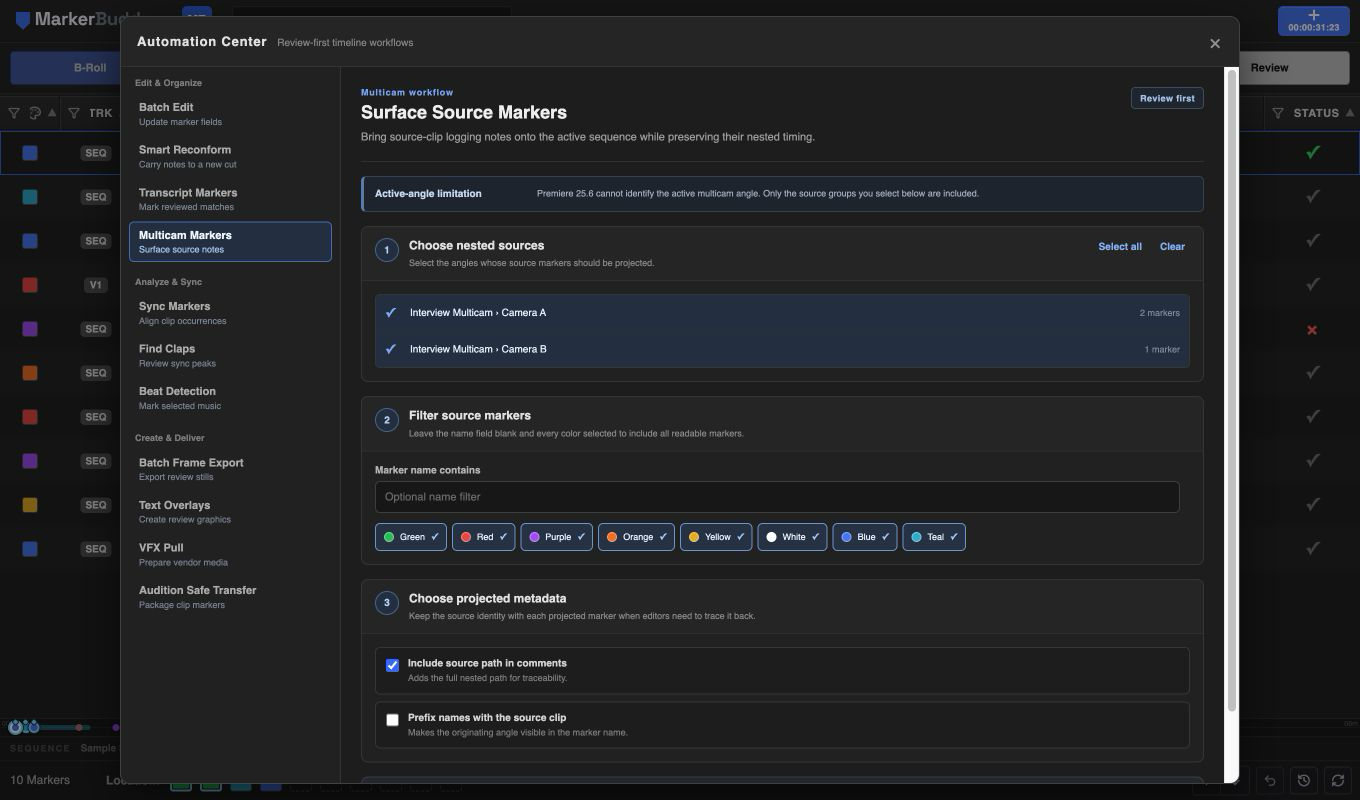
Inspect visible multicam and nested sources, map source-marker time through trims and playback offsets, filter exact sources, colors, and names, and surface reviewed markers on the active sequence. Running the same plan again skips markers already added. Premiere does not tell MarkerBuddy which multicam angle is active, so choose the source explicitly.
Read the Multicam Markers workflow →
VFX Pull Prep
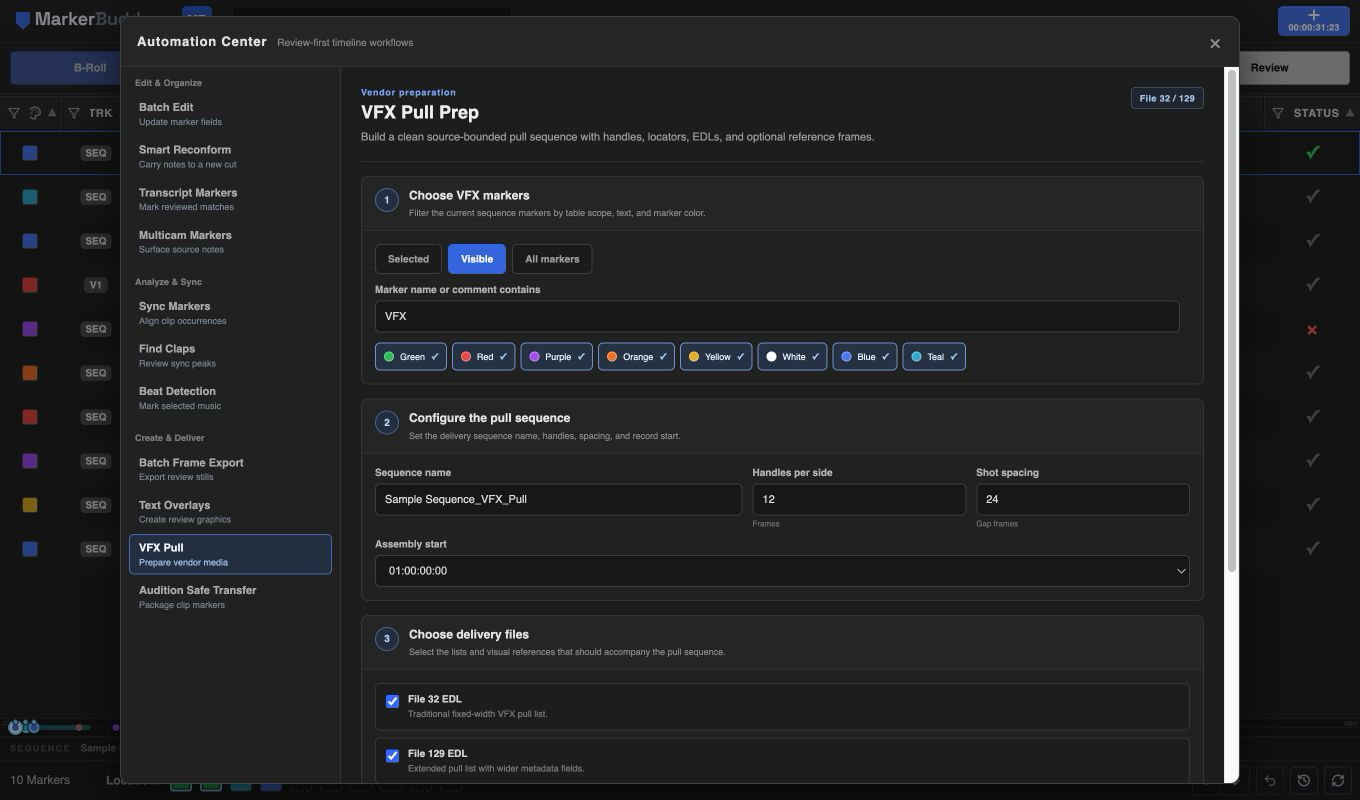
Build a clean single-video-track pull sequence from filtered VFX markers, clamp head and tail handles to real source bounds, add colored locators, write File 32/129 lists with source file and Tape ID, and optionally export full-resolution PNG references. Nested, multicam, reversed, and retimed shots are blocked rather than guessed.
Read the VFX Pull Prep workflow →
Markers to Text Overlays
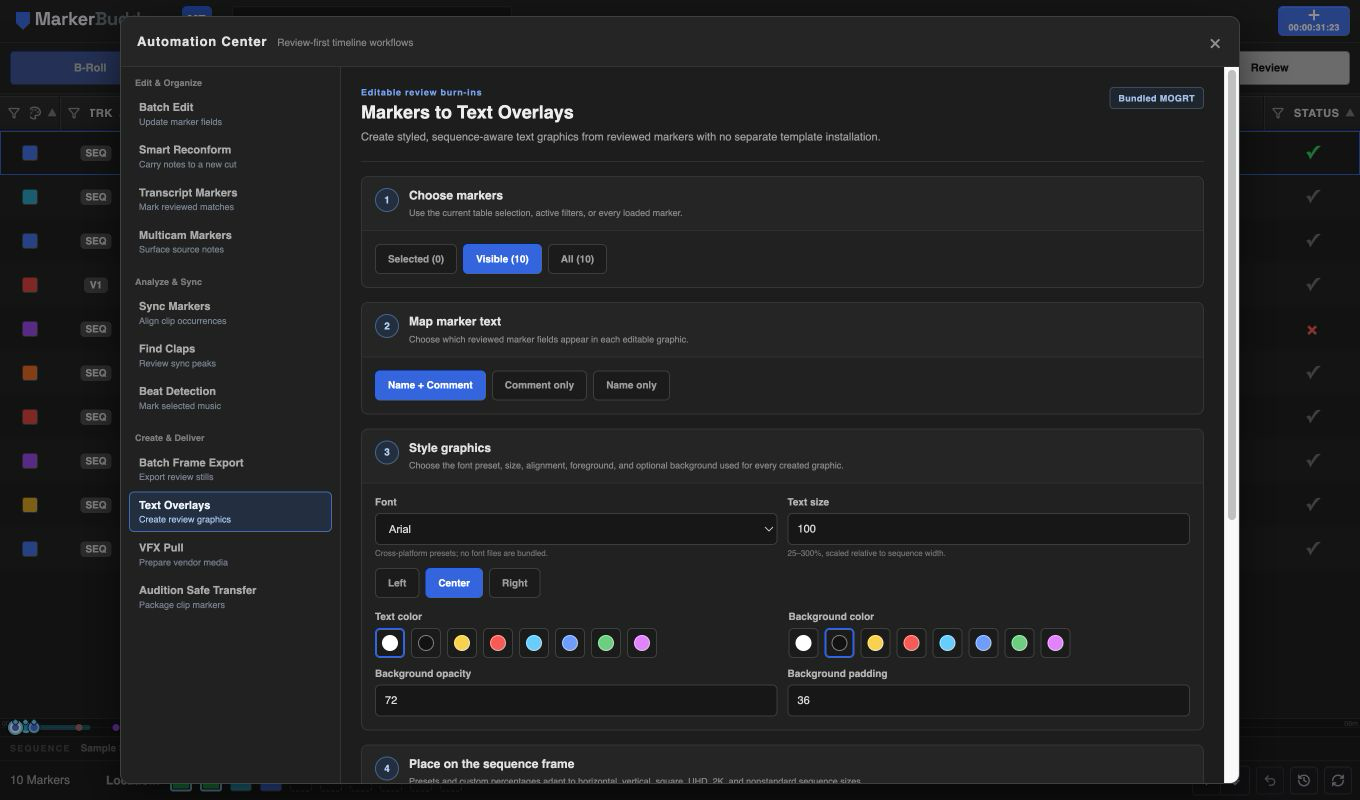
Convert selected, visible, or all reviewed markers into editable Premiere graphics using MarkerBuddy's included template. Choose the marker text, style, placement, timing, and destination video track. Placement adapts to HD, 4K, vertical, square, and custom sequence frames. Review any overlapping ranges or occupied-track conflicts before creating graphics.
Read the Text Overlays workflow →
Audition Safe Transfer
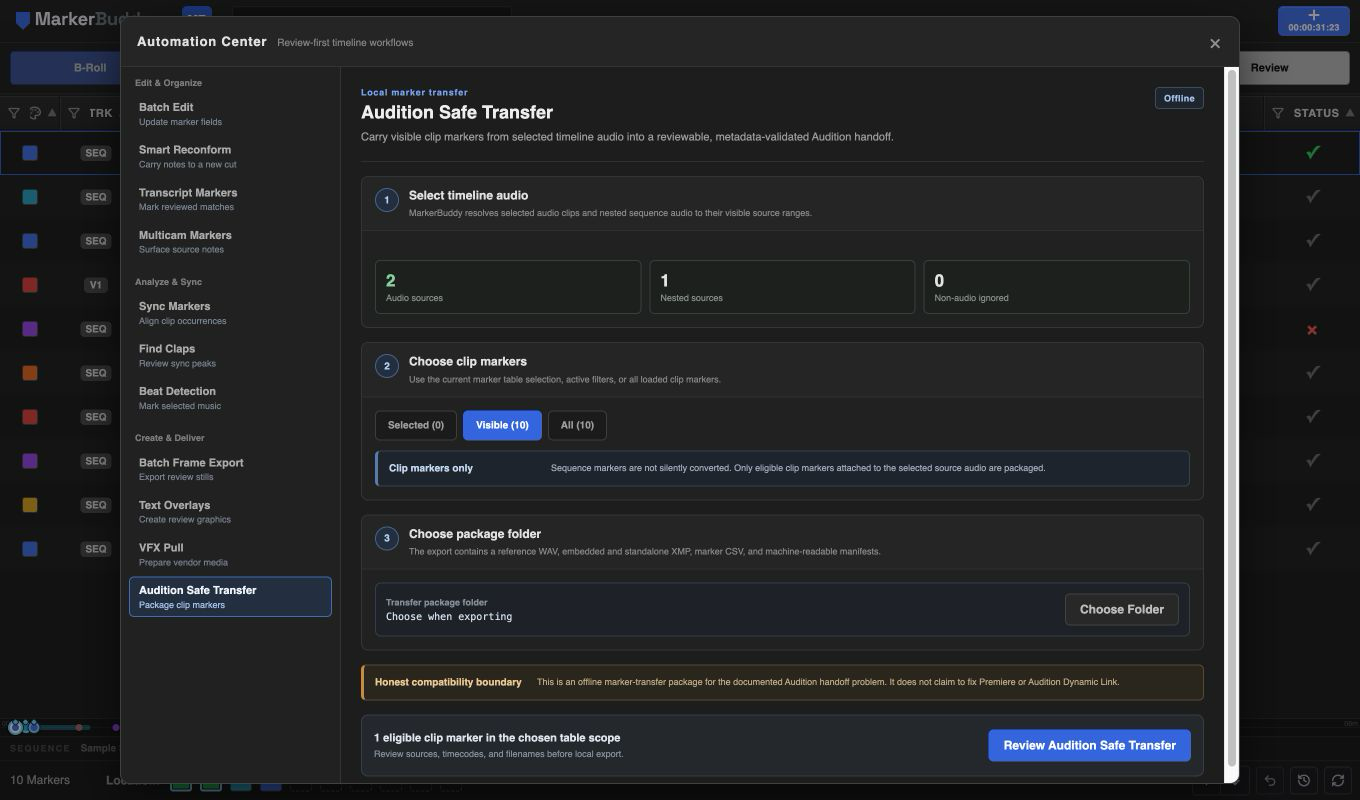
Resolve selected timeline audio and visible nested ranges to their underlying source files and source timecode. Package eligible clip markers into a local PCM reference WAV with embedded Broadcast Wave and Adobe XMP Dynamic Media metadata, plus standalone XMP, CSV, and JSON files. This file-based handoff is separate from Dynamic Link. Verify the marker track in Audition and use original production media for the final mix.
Read the Audition Safe Transfer workflow →
Change Marker Track
Left-click a marker's TRK badge to open Change Marker Track. If that row belongs to a multi-selection, the destination applies to the full selection; the selected group's right-click menu offers the same batch action.
Change Marker Track lists Sequence (Timeline Marker) first, followed by viable video tracks and then viable audio tracks. Each selected marker is resolved at its own timeline position. If its requested V/A track is unavailable, MarkerBuddy tries the next higher numbered track of the same media type only, never wraps lower, never crosses media types, and gives SEQ no fallback. After the batch, one message reports how many markers changed, already matched, or failed and names every fallback and actual destination. Moving a marker to a clip track removes its Location Memory assignment because Location Memory requires sequence markers.
Smart Reconform: carry markers to a newer cut
Open MarkerBuddy menu → Automation Center, then choose Smart Reconform to carry markers from an older sequence into a newer edit.
MarkerBuddy reconciles ordinary cut, paste, and move events automatically for marked clips in the active sequence, updating the marker table and Location Memory without a manual refresh.
Choose the old and new sequences and MarkerBuddy analyzes the edit automatically without changing either sequence. Use Cancel Analysis to stop analysis, or Stop Adding to finish the current marker and stop before the remaining approved markers are added.
- Choose the older source sequence that contains the markers and the newer target sequence.
- Review the Exact, Shifted, Ambiguous, Unmatched, and Duplicate results and their explanations.
- Confirm the markers and destinations you want. Clear matches may begin approved; uncertain and multicam-angle results always require your review.
- Click Apply n Markers. MarkerBuddy reports added, duplicate, failed, and cancelled markers separately.
Added markers keep their name, comment, color, duration, supported marker type, and Completed or Skipped status. The complete apply operation appears as one Smart Reconform item in MarkerBuddy Undo.
Markers inside ordinary nested sequences are included. Multicam and nested-multicam results remain available for review, but Premiere does not identify the active multicam angle for MarkerBuddy, so you must confirm those choices.
Nothing is added until you click Apply. Changing either sequence or making a relevant Premiere edit refreshes or invalidates the preview so an outdated result cannot be applied.
Importing markers and notes
Open the importer from MarkerBuddy menu → Import Notes/Markers (or the MarkerBuddy: Open Import command).
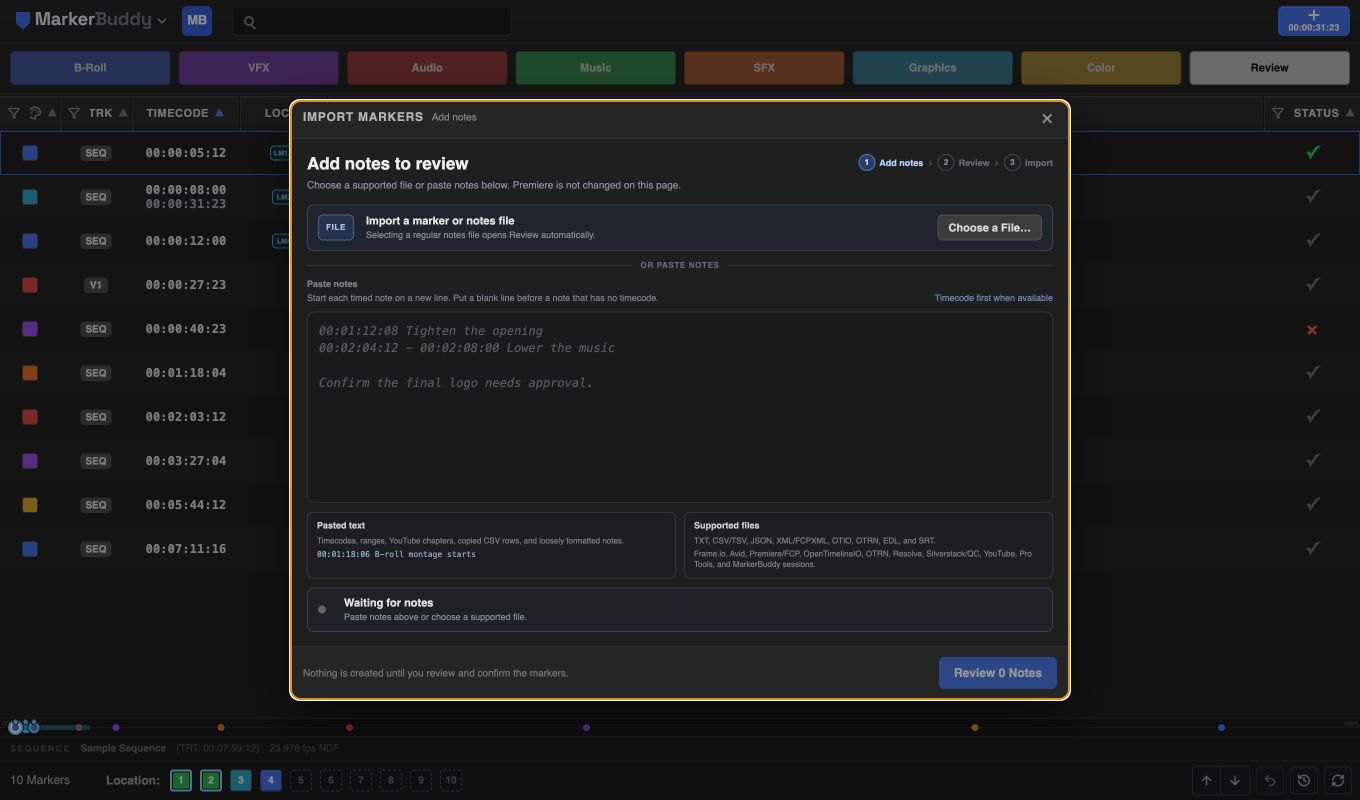
The Add notes page separates Choose a File… from the labeled Paste notes box. It lists supported pasted layouts, file extensions, and post-production sources, then reports the detected format, note count, and timing warnings before Premiere changes. Start each timed pasted note on a new line, and put a blank line before an untimed note so it remains a separate Review item. Pasted notes continue with Review n Notes; choosing an ordinary notes file opens Review automatically. Session snapshots keep their dedicated Restore Session action.
Review ordinary imports before writing markers
- On Add notes, choose a file or paste the notes. Confirm the detected format, note count, and timing warnings.
- For pasted notes, click Review n Notes. Ordinary file imports open Review automatically. Premiere is not changed yet. The header shows Total, Included, Ready, and Attention counts.
- Use Apply settings to all markers for a shared timecode offset, destination, color, marker name, or original-timecode suffix. Choose Save current preset for recurring clients or review rounds.
- Review the notes in source order. Correct the timecode, destination, color, name, or comment on any individual note that needs an exception. Options → Reset this note restores that note's imported values.
- Use Needs attention or Review next issue to find missing, invalid, or out-of-range timing. Correct the timing or turn off Include for notes you do not want.
- Click Import n Markers when every included note is ready. The approved markers are added in source order as one undoable operation.
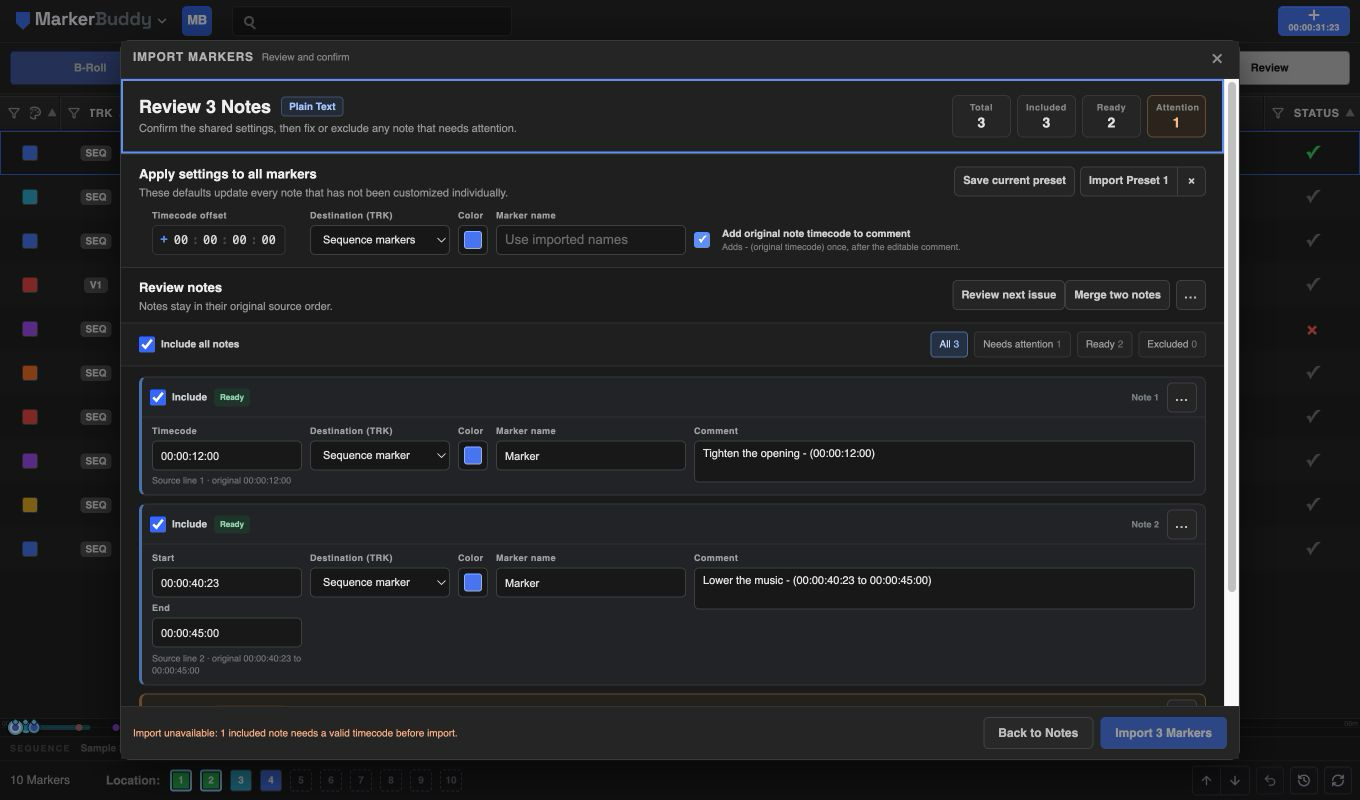
To combine two related notes, choose Merge two notes, select both notes, review the combined comment, and choose which timecode to keep when both are valid. Cancel leaves the review unchanged.
Use More → Reset all changes to discard review edits and return to the imported values. Session snapshots keep their direct Restore Session action because they restore the complete MarkerBuddy workspace together.
Supported formats: Frame.io comment exports (JSON/CSV/TXT), Avid locators and Avid Media Composer XML, Premiere / Final Cut Pro XML (FCPXML), OpenTimelineIO (.otio), EditingTools OTRN (.otrn), QC and Silverstack CSV/TSV reports, MarkerBuddy's own CSV reports, SRT subtitles, YouTube chapter lists, DaVinci Resolve and Pro Tools EDLs, plain text with timecodes (including loosely formatted "fuzzy" notes and timed note blocks), and MarkerBuddy session snapshots (.mbs.json).
Import options:
- NOTES FROM (batch name) - a label stamped as the name of every imported marker (e.g. "Client Notes v1"), so a whole feedback round is easy to find, filter, and delete as a group. The note text goes into the comment.
- Color chip - default color for the imported markers.
- Type: CLIP / SEQ - import as clip markers or sequence markers.
- Add Note Timecode To Comment - previews and appends the original note timecode exactly once as - (timecode) at the end of each comment. Frame-based file records are shown as timecode, not frame ####.
- TC Offset - shift every imported timecode by ± HH:MM:SS:FF. Essential when notes were taken against an export whose timecode starts at 01:00:00:00 but your sequence starts at zero (or vice versa).
- Import presets - save a combination of these options and re-apply it for recurring workflows.
Missing, invalid, and out-of-range timecodes stay visible in Review in source order with a specific explanation and editable timecode field. Reset restores imported values, and Add Note Timecode To Comment uses the preserved original so repeated edits never duplicate its suffix. The approved batch is fully undoable.
Batch Edit
Open MarkerBuddy menu → Automation Center. Batch Edit is the first tool and is active when the center opens.
Follow Change → Target markers → Review. MarkerBuddy shows how many markers and text matches are targeted and previews every Before / After result before you apply the batch.
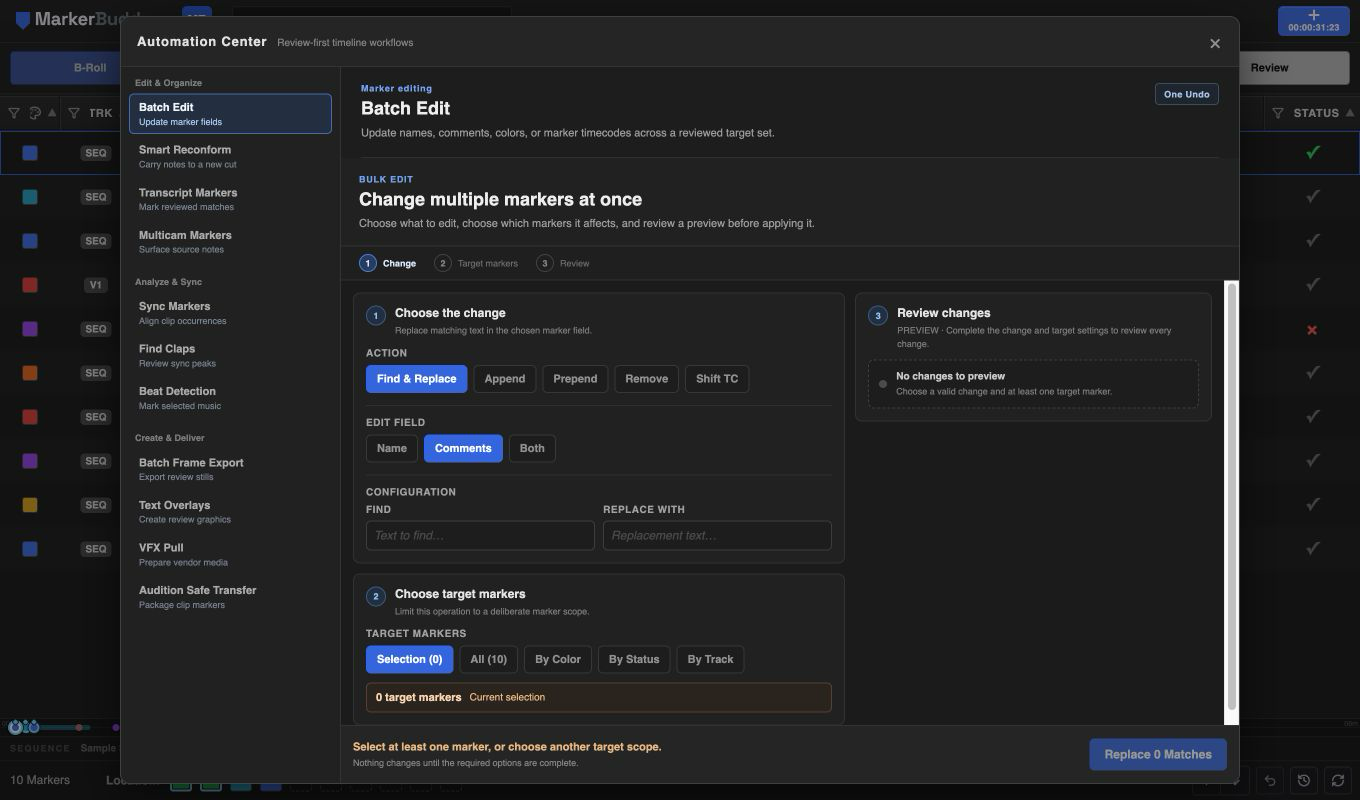
Actions: Find & Replace (with match-count preview), Append / Prepend, Remove, and Shift TC (± HH:MM:SS:FF). Text actions target the Name, Comments, or Both. Remove clears the chosen field and hides the unused text box.
Scope - Selection (n), All (n), By Color, By Status, or By Track. If Selection (0) is active, MarkerBuddy tells you to select at least one marker or choose another scope. Find & Replace requires a match, text actions require non-empty text, and Shift TC requires a non-zero offset. Batch edits are applied in one operation and appear as a single entry in the undo history.
Exporting markers
Open from MarkerBuddy menu → Export As (or the MarkerBuddy: Open Export command). If markers are selected, only the selection exports; otherwise everything currently visible after filters exports.
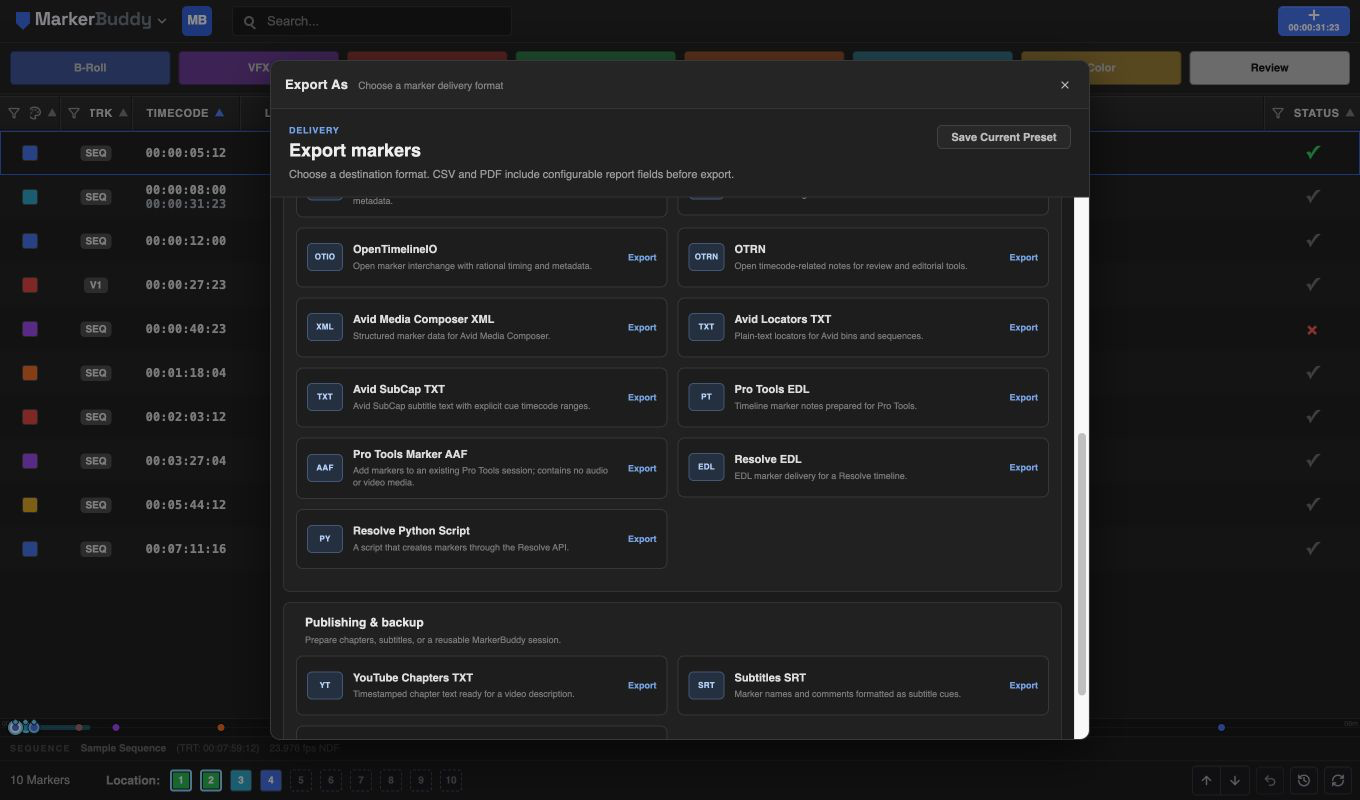
The format catalog is grouped into three purposes: Reports & data, Editorial interchange, and Publishing & backup. DaVinci Resolve exports are included in the relevant Reports & data or Editorial interchange group. Every format card explains what it creates before you choose it. CSV and PDF use Configure to reveal their existing options inside the card; direct interchange formats keep one-click Export actions. Narrow panels change the two-column catalog to one column without horizontal scrolling.
All 21 formats: CSV, Standard Marker CSV, Standard Marker TSV, Plain Text Marker Table, Excel 97–2004 Workbook, PDF report, Premiere XML, FCPXML, OpenTimelineIO, OTRN, Avid Media Composer XML, Avid Locators TXT, Avid SubCap TXT, Pro Tools EDL, Pro Tools Marker AAF, Resolve EDL, Resolve Marker Report CSV, Resolve Python Script, YouTube Chapters TXT, Subtitles SRT, and a MarkerBuddy session snapshot (.mbs.json) you can re-import later.
Open interchange: OpenTimelineIO exports a standards-readable Timeline and Track with rational point or ranged Marker.2 timing plus MarkerBuddy round-trip metadata. OTRN exports EditingTools-compatible notes with timing, ranges, colors, track hints, comments, and completion state. Both formats import through the ordinary review table before any marker is written.
Pro Tools Marker AAF
Use this marker-only AAF to add Premiere markers to an existing Pro Tools session. MarkerBuddy creates it locally without requiring Pro Tools on the export computer. It uses the active sequence's timecode settings. The file contains markers and timecode but no audio or video media, so it does not change the destination session's sample rate.
- In Pro Tools, choose File → Import → Session Data and select the AAF.
- On the Tracks tab, choose Clear All so no track is imported.
- On the Marker Rulers tab, map Markers to Markers.
- Select the timecode mapping required for the destination session, finish the import, and verify the marker times.
Range markers import as point markers at their start. Some characters that Pro Tools cannot read, including emoji, are replaced with ?.
- Fields - toggle individual CSV/PDF columns, or use All / None / Reset.
- Frame thumbnails - capture a still frame at each marker and embed it in the export. A progress indicator shows the capture and it can be cancelled mid-way. Thumbnail capture requires MarkerBuddy to be running in Premiere.
- Export presets - click Save Current Preset to remember a format plus its options; saved presets appear in their own card at the top of the dialog for one-click reuse.
Copy and paste markers
- Copy (MarkerBuddy menu, enabled when markers are selected) - copies the selection to the system clipboard as tab-separated text you can paste straight into Google Sheets, Slack, or an email.
- After you copy markers, a Paste n Markers entry appears in the menu and a Paste button appears in the footer. Use either one to duplicate the copied markers in the current sequence or move them into a different sequence.
Undo history
MarkerBuddy keeps its own undo stack for panel operations - imports, batch edits, deletions, conversions, status changes, recolors, and more.
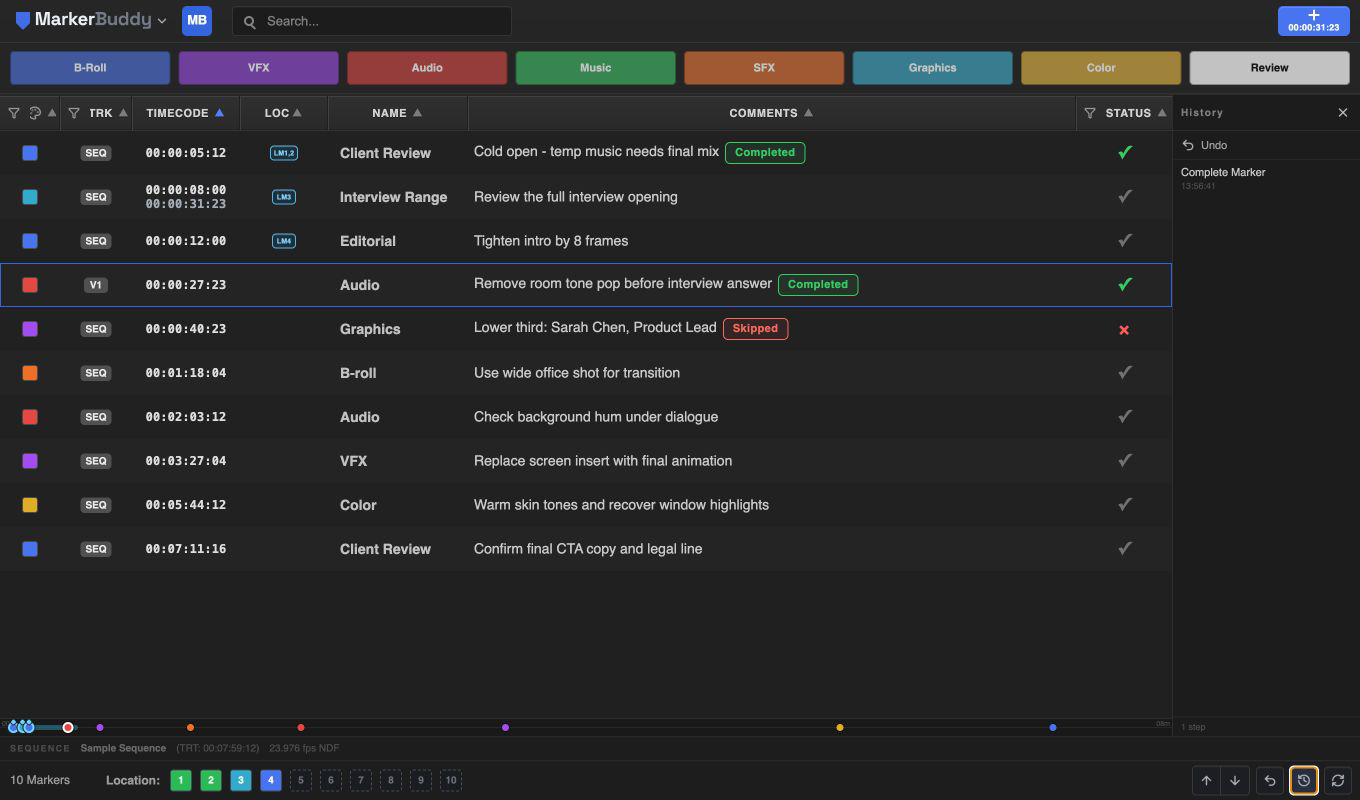
- The footer ↩ undo button reverts the most recent operation.
- The history button opens the panel listing each step with its timestamp. Click an entry to roll back to that point (multiple steps at once).
- A bulk delete or import appears as one MarkerBuddy Undo item, so you can restore it in one step.
- A Smart Reconform batch is one undo entry on its target sequence, even when that sequence was not active during analysis.
- An active-sequence Transcript Markers batch is one MarkerBuddy Undo entry. A Source Monitor clip-marker batch uses Premiere’s native Undo.
The MarkerBuddy menu (settings)
Click the MarkerBuddy logo in the top-left to open the main menu.
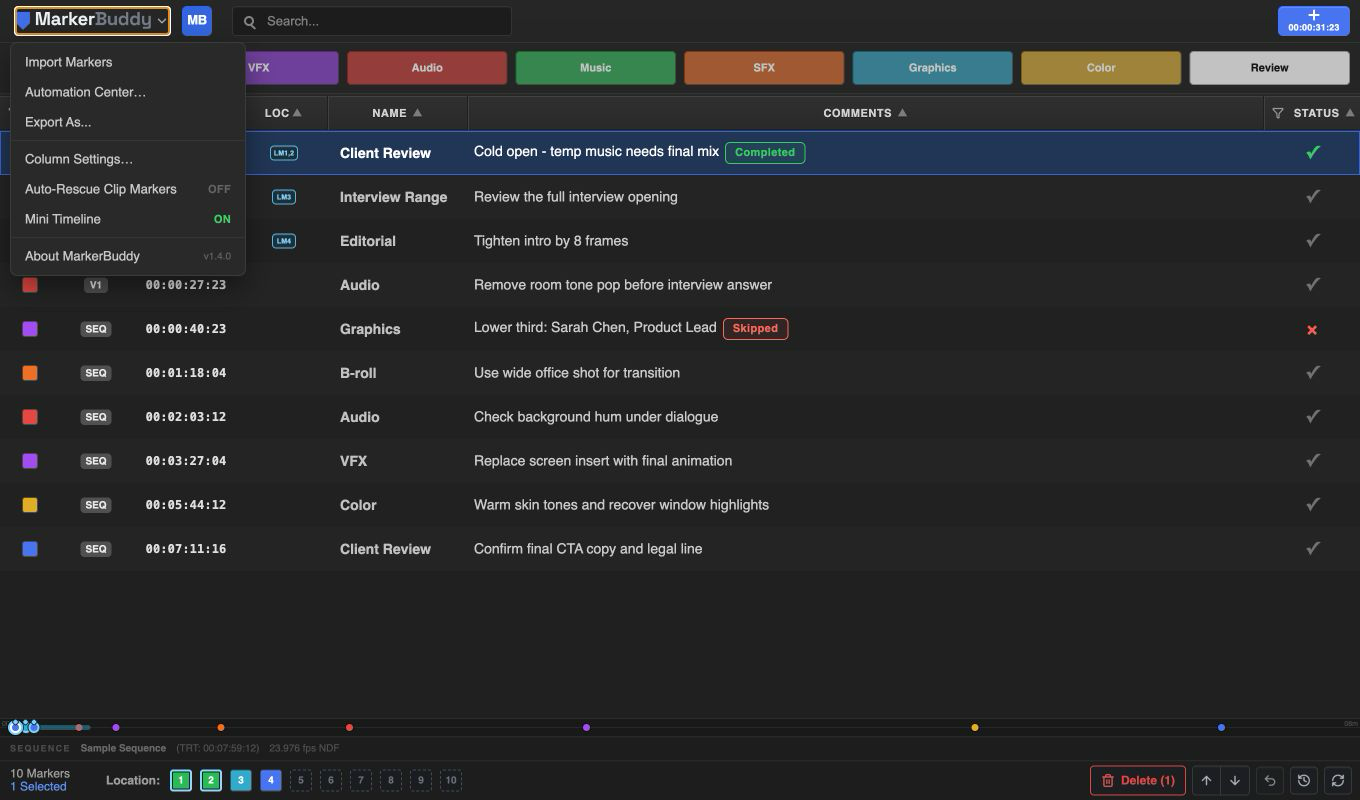
- Import Notes/Markers - open the centered Main Panel importer dialog.
- Automation Center - open or find the independent twelve-tool workflow panel.
- Export As - open the centered Main Panel export dialog.
- Panel shortcuts below the menu separator:
- Add Marker Panel - open or find the responsive Add Marker mirror.
- Quick Markers Panel - open or find the synchronized Quick Markers mirror while keeping the Main Panel controls available.
- Location Memories Panel - open or find the synchronized vertical Location Memories mirror.
- Column Settings… - rearrange, show, hide, and reset the seven supported columns, then manage unified saved presets.
- Auto-Rescue Clip Markers (ON/OFF) - restore only unique, exact, unchanged clip-marker locations during a manual refresh.
- Mini Timeline (ON/OFF) - show or hide the marker map above the footer.
Copy is one action: right-click selected markers or press Command/Ctrl+C to write human-readable tab-separated text and keep those markers available for Paste. Right-click empty table space or press Command/Ctrl+V to paste; recognized MarkerBuddy text opens Import Review.
Layout changes and menu toggles persist between sessions.
Keyboard shortcuts
MarkerBuddy commands cannot be assigned in Premiere's Edit → Keyboard Shortcuts window. Panel shortcuts work while MarkerBuddy has focus, and Stream Deck provides optional hardware controls.
MarkerBuddy provides panel-local shortcuts while its panel has focus: Command+A on macOS or Ctrl+A on Windows selects visible rows; Command+C or Ctrl+C copies selected markers; Command+V or Ctrl+V pastes; Command+Z or Ctrl+Z runs MarkerBuddy Undo; and Delete or Backspace deletes the visible selection. Search, inline Timecode/Name/Comments editors, preset names, menus, dialogs, and filter popups retain native text selection, copy, paste, undo, and deletion. These panel-local actions are not assignable Premiere shortcuts.
Icon-only footer actions, color choices, marker-table color controls, mini-timeline markers, dialog close and cancel controls, Quick Marker configuration, and Undo History expose explicit screen-reader names plus selected, expanded, pressed, or disabled state where applicable. Import review moves keyboard focus to its summary and returns focus to the MarkerBuddy menu after closing.
For physical buttons, install the MarkerBuddy Stream Deck plugin and assign its matching actions in the Stream Deck app.
Tips and troubleshooting
- MarkerBuddy is waiting for Premiere or an active sequence - make sure Premiere is open and a sequence is active in the Timeline. MarkerBuddy detects it automatically.
- Edits look reverted for a moment after saving - Premiere can take a few seconds to show a saved marker change. Brief flickers usually resolve on their own; use the footer refresh button if the table still looks out of date.
- Clip markers missing after a refresh - enable Auto-Rescue Clip Markers, then refresh again. It restores only a clearly unchanged location. For edited, reused, nested, retimed, reversed, missing, or uncertain locations, open Smart Reconform to review the choices.
- Transcript Markers says no transcript is available - open Window → Text, select the Transcript tab, and transcribe the named sequence or clip. MarkerBuddy reads an existing Premiere transcript but cannot start transcription.
- Transcript preview targets the wrong item or becomes stale - activate the intended Timeline sequence or open the exact project item in the Source Monitor, then run the search again. MarkerBuddy rejects a changed target before creating markers.
- A Location Memory slot shows a warning or will not jump - MarkerBuddy cannot find one unique assigned marker. Right-click the slot and choose Clear location, or reassign the intended sequence marker by dragging its row or choosing Set as Location Marker.
- The marker table says all columns are hidden - open MarkerBuddy menu → Column Settings…, then choose Show All or enable only the columns you need.
- A Stream Deck key shows a yellow alert - make sure Premiere is running, an active sequence is open, and MarkerBuddy 1.5.1 is installed. On macOS, enable Stream Deck in System Settings → Privacy & Security → Accessibility and restart Stream Deck. On Windows, confirm that company security settings allow Stream Deck to control Premiere.
- A Quick Marker key runs but no marker appears - open MarkerBuddy, right-click the corresponding QM slot, and save its template.
- Import is waiting on the review table - correct or exclude every included row with a missing, invalid, or out-of-range timecode, then approve at least one Include row and click Import n Markers.
- Import puts markers in the wrong place - check the TC Offset. If the notes were written against a 01:00:00:00-start export, set the offset to −01:00:00:00 (or the reverse).
- Bulk mistake? - open the undo history and click the step you want to roll back to.
- Working with a client's spreadsheet - select markers and use Copy; the tab-separated output pastes cleanly into Sheets/Excel with columns intact.
21. Changelog
Version 1.5.1 - September 9, 2026
Improved stability and responsiveness throughout MarkerBuddy/Lite, with additional bug fixes and general performance optimizations. Recommended for all MarkerBuddy/Lite users.
Version 1.5.0 - August 1, 2026
- Flexible workflow surfaces: Opens Import Notes/Markers and Export As as centered Main Panel dialogs, while Automation Center and the alternate Window menu entries remain available as independent non-modal Adobe Premiere panels.
- Quick Marker and Location Memory mirrors: Keeps Quick Markers and Location Memories in the Main Panel while optionally opening a second synchronized panel for either tool. Changes and actions are reflected immediately in both places.
- Add Marker panel: Adds a compact, responsive Add Marker panel that mirrors the Main Panel button and can stay near the part of the workspace where markers are being added.
- Released MarkerBuddy Lite! A free version of MarkerBuddy with core functionality only.
Version 1.4.1 - July 28, 2026
- Safer Batch Shift: Moves requested sequence and clip markers together, including markers on retimed or reversed clips. If any destination is unavailable or outside the sequence, nothing moves.
- Reliable OTIO and OTRN interchange: Keeps markers correctly timed through trims, nesting, and supported speed changes, preserves completion and MarkerBuddy status, and flags timing it cannot place safely for review.
- Predictable audio analysis: Ignores disabled audio inside nested selections and clearly reports whether analysis was cancelled before changes, cancelled after adding markers, finished with failures, or completed successfully.
- Consistent context actions: Makes right-click and keyboard context menus reliable across Quick Markers, marker defaults, Location Memory, import and export presets, and marker rows.
- Marker workflow fixes: Applies status changes correctly to mixed selections, hides unchanged Batch Remove rows, keeps Location Memory jumps in the intended sequence, and makes new Location Memory assignments travel with shared Adobe Premiere projects.
- Interface clarity: Makes Transcript Markers easier to read, starts Quick Markers closed for new users with a dedicated header button beside Add Marker, moves Search beside the MarkerBuddy menu, and clarifies Change Marker Track, sequence details, mini-timeline cues, and Location Memory.
- Stream Deck Quick Marker keys: Gives the eight shipped Quick Marker keys their default names and colors: B-Roll, VFX, Audio, Music, SFX, Graphics, Color, and Review. All ten Location Memory keys use the same MarkerBuddy blue bullseye.
- Performance and resilience: Keeps marker order accurate at the sequence frame rate, improves responsiveness for large marker lists and long clip searches, and fixes retries after a PDF, spreadsheet, or AAF export fails to start.
- Pro Tools Marker AAF: Adds a marker-only AAF for moving Premiere sequence timecode and marker details into an existing Pro Tools session. It contains no audio or video media, and Pro Tools is not required on the export computer.
Version 1.4.0 - July 27, 2026
- Automation Center: Keeps the complete eleven-tool catalog visible in three stable groups, with Batch Edit active by default and contextual Batch Edit or Sync links selecting the relevant tool without filtering or hiding any other workflow.
- Contextual marker actions: Adds compact right-click actions for one marker, multi-selections, TRK, status, timecode, and empty table space, including Set as Location Marker, Change Marker Track with Timeline Marker plus viable video/audio destinations, direct point/range time editing, Batch Edit, Export As, eligible Sync @ workflows, Paste, and Import.
- Location Marker column: Moves LM badges out of Timecode into a centered LOC column immediately after it. LOC stays hidden until a Location Marker is assigned, then supports sorting, resizing, reordering, visibility controls, saved layouts, and direct jumps like the other marker-table columns.
- Sequence-aware Add Marker timecode: Displays the active sequence’s complete timeline timecode in the Add Marker button and its point, syncing, and spanned In/Out guidance, including sequences with non-zero display starts and drop-frame timecode.
- Unified copy, paste, and undo: Replaces the separate text-copy command with one Copy action that writes human-readable tab-separated text and retains a reusable internal marker copy, adds panel-local Command/Ctrl+C, V, and Z with native text-field protection, and extends chronological Undo to destination, timecode, paste, and Location Marker changes.
- Find Claps: Analyze selected audio locally for likely clap/slate candidates, review false-match risks, choose one of eight colors, and add Clap Marker source markers with Clap @ source-timecode comments that remain correctly mapped through nested sequences.
- Beat Detection: Search the complete supported BPM range automatically with no range setup and estimate a local pulse grid for selected audio clips only, review tempo stability and every proposed marker, choose marker density and one of eight colors, then add Beat Marker points with empty comments without claiming downbeats, bars, or meter.
- OTIO and OTRN interchange: Import and export OpenTimelineIO marker files and EditingTools OTRN note files with rational timing, ranges, colors, track hints, comments, completion data, and MarkerBuddy sequence-or-clip destination metadata.
- Batch Frame Export: Export full-resolution stills from selected, visible, or all markers in eight image formats with flexible filenames and safe duplicate handling.
- Sync and Multicam: Align linked clips from explicit Sync @ marker instructions with forgiving drop-frame translation and collision checks, then surface logging markers from nested multicam sources.
- VFX Pull Prep: Build source-bounded pull sequences with handles, locators, File 32/129 EDLs, and optional full-resolution reference frames.
- Text Overlays: Convert reviewed marker names and comments into styled, timed, editable graphics with MarkerBuddy’s bundled local MOGRT, font/alignment/color/background controls, percentage-based placement across 4K, 2K, 1080p, vertical, square, and nonstandard sequence frames, range preservation, point timing, changed-frame and track-collision preflight, and result receipts.
- Audition Safe Transfer: Package selected and nested audio clip markers completely offline as reference WAVs with validated BWF and Adobe XMP metadata plus standalone XMP, CSV, and JSON files without claiming to repair Dynamic Link.
- Workflow refresh: Improved Batch Edit, Export As, Smart Reconform, Transcript Markers, and Automation Center, and added useful first-run Quick Markers for B-Roll, VFX, Audio, Music, SFX, Graphics, Color, and Review.
Version 1.3.1 - July 23, 2026
- Speaker filtering: Inspect language, timed-word counts, named speakers, duplicate speaker names, and unlabeled words before matching, then include only selected Premiere speaker IDs.
- Speaker-aware output: Add a named speaker to marker comments by default and optionally prefix the marker name without inventing a name for unlabeled words.
- Marker duration: Create the existing point marker or span the exact matched phrase.
- Safer phrases: Keep same-speaker matches across adjacent segments while preventing one phrase from crossing different known speakers.
- Clearer workflow: Use Find Matches to review transcript results before creating any markers.
Version 1.3.0 - July 18, 2026
- Transcript Markers: Turn reviewed matches from an existing Premiere transcript into named, colored point markers without uploading the transcript.
- Comment context: Add up to 50 surrounding words to marker comments without moving the marker. Sequence markers work with nests and multicams.
- Cleaner windows: Transcript Markers, Smart Reconform, and Batch Edit are more compact and scroll properly in small panels.
- Clearer Batch Edit: Choose a change, target the intended markers, and review every Before / After result before applying one undoable batch.
- Location Markers: Save ten sequence-specific marker bookmarks, safely recover moved markers, and jump from the panel or Stream Deck.
- Expanded Stream Deck support: Location Memory 1-10 brings the local integration to 25 actions.
- Default Marker Settings: Right-click the top-right add button to edit the default marker name and color.
- Reliable spanned markers: A valid live In/Out range creates one spanned sequence marker even when point markers already exist inside it.
- Interface clarity: Keeps Location Memory, status, and main-menu controls easy to identify.
- Row selection: Select directly from marker rows with desktop modifiers, clear from unused table space, use visible-only Command/Ctrl+A, and delete immediately with undo.
- Column Settings: Reorder and hide any of six columns, automatically retain layouts, and save unified presets for columns, filters, search, and Quick Marker settings.
- Import Review: Keep every source note in order, correct timing and marker fields, reset individual notes, and deliberately merge two notes before the undoable import.
Version 1.2.0 - July 15, 2026
- Stream Deck support: Introduced 15 local actions for markers, navigation, Undo, and statuses on macOS and Windows.
- Better marker placement: Clip markers land at the playhead; sequence markers can follow In/Out. The integration runs locally, and macOS requires Accessibility access.
Version 1.1.1 - July 15, 2026
- More reliable imports and exports: Fixed multiline Frame.io comments, MarkerBuddy and Resolve CSV files, YouTube chapters, 24 fps FCPXML timing, and quoted text.
Version 1.1.0 - July 14, 2026
- Smart Reconform: Review and carry markers from an older cut to a newer one, including nested and multicam edits, with Undo.
- Safer marker recovery: Auto-Rescue restores only exact matches; uncertain changes stay unchanged for review.
- Clearer statuses: Added Completed and Skipped badges and improved status handling in comments, batch edits, and exports.
Version 1.0.0 - July 9, 2026
- First release: Marker editing, Quick Markers, imports and exports, statuses, conversion, and Undo.
- Private by default: No account, cloud service, telemetry, or background network requests.
